Tuesday, June 27, 2017

Controllers:

Difference between standardcontroller, controller and extensions in Salesforce?


Standard controller in Apex, inherits all the standard object properties and standard button functionality directly. It contains the same functionality and logic that are used for standard Salesforce pages.
Custom controller is an Apex class that implements all of the logic for a page without leveraging a standard controller. Custom Controllers are associated with Visualforce pages through the controller attribute.
Standard Controller:
Standard Controller contain the same functionality and logic that are used for standard Salesforce pages.Can be used with standard objects and custom objects.

Controller:
Custom Controller is noting but we can define our logic and Functionality.If we want fine control for how information is accessed for your page, you can write a custom Controller.
Only one Apex class is used.

Extensions:
By using the extensions we can extends the functionality of a standard or custom controller.Multiple Apex classes separated by comma are used.


What is the difference between public and global class in Apex?


Global class is accessible across the Salesforce instance irrespective of namespaces.
Whereas, public classes are accessible only in the corresponding namespaces.


Standard Controller Extension,Custom Controller Extensions and Uploading the image and displaying in contact details page.


Hi,
In this post i am trying to give a small example on Standard Controller Extension. so the usage of Standard Controller Extension (or) Controller Extension is to extend the functionality.

Here the requirement is create a visualforce page using standard controller and extend the upload image functionality in VF page and display the image in Contact detail page. for this i created two fields in Contact object.

1).  Created a Text field with Name "Srinivas__Images_Path__c" length of 255  to store the url of the image.
2). Created a Formula Field with the name of "Srinivas__Picture__c" return type as Text like this.


Extension Class:

Here i created a class and used Standard Controller in constructor. once the user upload the image that image details is stored as attachment and put the attachment record url in contact object text field to populate with formula field.

public class ContactPhotoExtension {

public Contact cont;
public blob picture {get;set;}

 public ContactPhotoExtension(ApexPages.StandardController st){
  this.cont = (Contact) st.getRecord();
 
 }
 public PageReference save() {
 PageReference pr ;
  try{
     insert cont;
     if(picture !=null) {
      Attachment attachment = new Attachment();
        attachment.body = picture;
        attachment.name = 'Contact_' + cont.id + '.jpg';
        attachment.parentid = cont.id;
        attachment.ContentType = 'application/jpg';
        insert attachment;
     cont.Srinivas__Images_Path__c = '/servlet/servlet.FileDownload?file='+ attachment.id;
                update cont;
       Pr = new PageReference('/'+cont.id);
       pr.setRedirect(true);
    }
   
  
  } catch(Exception  e){
   system.debug('Error Message==>'+e);
  }
 
  return pr;
 } 

}


Visualforce Page:


<apex:page standardController="Contact" extensions="ContactPhotoExtension">
<apex:form >
 <apex:pageblock title="Contact With Image">
  <apex:pageblockButtons >
   <apex:commandButton action="{!Save}" value="Save with Image"/>
    </apex:pageblockButtons>
    
    <apex:pageblockSection title="Contact Information">    
     <apex:inputField value="{!Contact.FirstName}"/>
     <apex:inputField value="{!Contact.LastName}"/>
     <apex:inputField value="{!Contact.Email}"/>
     <apex:inputField value="{!Contact.Phone}"/>
    </apex:pageblockSection>
     <apex:pageBlockSection title="Upload Image Here">
      <apex:inputFile value="{!picture}" accept="image/*" />
     
     </apex:pageBlockSection>
 </apex:pageblock>
</apex:form>
</apex:page>

once you develop these things try to create a record with image and click on "Save with Image" button.


Finally the record detail page is like this.


like this you can extend the functionality of standard or custom with out building the all the things.

Custom Controller With Extension:

Here i created two simple classes to demonstrate simple custom controller extension.

Class 1 :

in this class i am querying account records and stored those in list.

Public class AccountDisplatRecCls{
  public List<Account> getAccounts(){
   List<Account> accList = [select id,Name,AccountNumber from Account];
   return accList;
  
  } 
 }

Class 2:
in this class i am querying contact records and stored those in list and displaying in vf page. 

public class AccountDisplatRecClsExtn{
 
 public List<Contact> contList {get;set;}
 
  public AccountDisplatRecClsExtn(AccountDisplatRecCls act){
    contList = [select id,FirstName,LastName,Email from Contact];
  }
   
 }


Visualforce Page:

in this page i am using booth custom controller and extension controller.


<apex:page controller="AccountDisplatRecCls" extensions="AccountDisplatRecClsExtn">
<apex:pageBlock title="Account Records">
  <apex:pageblockTable value="{!Accounts}" var="acc">
   <apex:column value="{!acc.Name}"/>
   <apex:column value="{!acc.accountNumber}"/>
  </apex:pageblockTable>
</apex:pageBlock>

 <apex:pageblock title="Contacts Details">
  <apex:pageblockTable value="{!contList }" var="con">
    <apex:column value="{!con.FirstName}"/>
     <apex:column value="{!con.LastName}"/>
         <apex:column value="{!con.Email}"/>
  </apex:pageblockTable>
 </apex:pageblock>
  
</apex:page>

Output:


Further reference :

http://www.salesforce.com/docs/developer/pages/Content/pages_controller_extension.htm

Single Sign On:

What is the difference between configuration and customization in Salesforce.

Configuration:

•Configuration means providing a user defined values which will enable a given feature or module to function.
Example: Email setting is an example of configuration.
•salesforce users can configure CRM application. Marketing User can enable few tabs which are not available for Customer support people.
• Adding a new field to a given salesforce object is configuration.
• adding a new field which will use formula to perform some result is configuration

Customization:

•Any feature or functions which are not available as a part of application and the application needs to extend refers to customization.
•Despite you configured the things there are few actions which are not achievable and it results into adding some custom code, which results in Customization.
• Adding triggers on the object to perform some action is called customization
• Adding Apex Code which will generate a vCard from a given Contact is called Customization.

How to Implement Single Sign On for Across Multiple Organizations In salesforce?

In this Article we will use one Salesforce Intense as Identity Provider and Other Salesforce Instance as Service provider.
Before Starting you have to decide which salesforce instance will act as Identity Provider and which will act as Service Provider.

Step 1: Enable Domain In Identity Provider Organization

From Click Domain Management | My Domain. Enter a new sub domain name, and click Check availability. If the name is available, click the term and condition box,Then click register domain.

Step 2: Enable Identity Provider

From Set up click  Security controls | Identity Provider
Click Enable
Click "Download Certificate". Remember where you save the certificate , as you will upload it later.

Once you enable identity provider ,you will see page like below with Identity Provider related Information.

Image 

In Above Image ,Issuer is Nothing But  domain URL of Identity Provider Org.


Step 3: Enable Single Sign On in Service Provider Org

Now we have to go to other Salesforce Instance which is acting as Service Provider.

From Setup,Click "Security Controls | Single Sign-On Setting" then click  Edit.
Select SAML Enabled check box.


We have to upload certificate download from Identity Provider to here in Service provider while declaring SSO related settings. we have to come back again here to setup "Identity Provider Login URL".

We will get this URL once we define Connected App in Identity Provider instance.
Use the following settings

Image 

Step 4: Define Connected App in Identity  Provider Instance 

Log into the salesforce organization that act as the Identity provider.


From Setup.Click Create | Apps, then in the "Connected APP" Section , Click New

Specify the following information:

Connected App Name: Salesforce Service Provider
Contact Email :
Enable SAML: Select this option to enter service provider details.
Entity ID:
ACS URL:

Once you save, you should be able to see settings page something like shown below :

Image


NOTE: Once you define Connected App, We need to add which profiles should be able to access this app.


From above setting page ,copy url of "IDP-Initiated Login URL" and  go back to SSO setting page of Service Provider and Add this URL.

Image

Step 5: Setting up Users


Everything is already at place, Lets start with user setup.


Copy one of User name from Identity Provider Instance to "Federation ID" fields of related user in Service Provider.


Example : In Identity Provider , ihave user "".Now in Service Provider i have user "" and want to relate this user. SO In federation ID filed of "" user, i will copy "".


Image


Testing Scenario :


To Test this, We need to inform salesforce that Instead of standard login page, Users have to use single sign on settings.


Image


Setting up Single Sign-On in Salesforce.

Hi,


Here is the video to setup a signle sign on salesforce and the documentation is available inhttps://developer.salesforce.com/page/How_to_Implement_Single_Sign-On_with_Force.com

Validation Rules In Salesforce

Validation rules helps you to improve data quality by preventing users from entering incorrect data. We can write one or more validation rules that consists of an error and corresponding error message.

1. Validation rules are executed will executed, when you are saving the record.
2. A validation rule that contains a formula or an expression that evaluates the data in one or more fields and returns a value, true or false. We can display error message at the top of the page or below the field when rule returns true.
3. After writing validation rules for a field or for set of fields, following actions will fired when user creates a new record or edits an existing records and then click on save button.
Salesforce executes validation rules you defined and if data is valid then record will save.
If entered invalid data, it will display the associated error message without saving the record.
Even if the fields referenced in the validation rules are not visible on the page layouts, the validation rule still apply and will result in an error message if the rule fails.

Creating validation rules:
For standard objects Go to setup -> Build – > Customize -> select standard object you want to create validation rule (For Ex: Account) -> and click on validation rules and then define your validationrule.

For custom objects Go to setup -> Build -> create -> object -> select object you want to create validationrules -> go to validation rules section and then create your validation rule.

1. What are validation rules?
Validation rule contains an error condition and error message. If evaluation of error condition results in true value, record is not saved, and the error message is generated. Validation rules can be attached to fields. They are executed when a record is created or updated.

2. Can we avoid deletion of records through validation rules?
No. Validation rules fire in insert and update operation.

3. Can we bypass validation Rules?
Validation rules can never be bypassed. If we have upload records and need to bypass validation, then deactivate validation rule and upload records. After upload, again activate validation rule.

4. Is it possible to fire validation only for records which is being getting updated not to newly inserted records?
Yes, We can use ISNEW() function which will return true whenever new record is getting created in validation rule. We can use this function and check our criteria only if ISNEW() function is returning false(means record is being updated).

5. Is there is any way through which validation rule is bypassed while doing upload through data loader  but not when user is creating record from user interface?
Yes. Create a checkbox field as API upload and make this field hidden in page layout. Create a validation rule and in evaluation criteria first check if checkbox is false and then check other validation criteria.
Whenever user upload record through data loader, specify value for this checkbox as true in .csv file and then upload it to salesforce. While upload, validation rule will fire and will find checkbox value as true so it will not check other criteria and system will allow to upload records.

6. What is the difference between ISBLANK() AND ISNULL()?
ISNULL() works only for number data type fieds, if we don't populate with value for number fields it will return true.
ISNULL() won't support TEXT data type fields because text fields never become null.
ISBLANK() supports both number as well as text data types.

7. What are cross object formula fields?
Cross-object formulae span two or more objects by referencing merge fields. By using this you can refer parent fields from child record.

8. What are different ways to make field required in salesforce?

  1. While field creation, specify required field as true.
  2. Through page layouts
  3. Validation rule
  4. Apex trigger
9. Admin wants to avoid the deletion of child records in master detail relationship. Is it possible to achieve this using point and click functionality?
Yes. First create a roll up summary field on parent which calculates the total count of child records. Now write a validation rule on parent object which checks if previous value of total count is less than new value. If yes, then display error message.
Suppose field name is total_count__c in parent object then validation rule criteria will be:
Priorvalue(total_count__c) <total_count__c
When we delete the child record then roll up summary field value will get reduced by 1. System will update the parent record roll up summary field which will fire the validation rule and avoid user from deleting child record.

Validation Rules In Salesforce:

1)Restrict specific profile when opportunity stage = closed they doesn't change or modify that
 record for specific  profile.

AND($Setup.jl_runvalidations__c.Run_Validations__c,AND( 
ISPICKVAL(PRIORVALUE(StageName),"Closed Won"), 
($Profile.Id = "00e28000001N8Zv") 
))

2)

How to Return PageReference from a webservice method

In your Class use a String as a Returntype
and create your reference like this in your webservice class
?
1
return String.valueOf( new PageReference('/'+Case.Id).getUrl());
and in your Button, you have to catch your return String and reload the page:
?
1
2
var newurl = sforce.apex.execute("TestClass","CreateTestRecords", {id:"{!Case.Id}"});
parent.location.href = newurl; //refresh the page

Deployment:
What are the different ways of deployment in Salesforce?
You can deploy code in Salesforce using:
1.        Change Sets
2.        Eclipse with Force.com IDE
3.        Force.com Migration Tool – ANT/Java based
4.        Salesforce Package

--------------------------

deployment errors in sfdc:

  • Test Method Failure - While deployment if any of the test methods fails then deployment can not happen. There could be various reason for test method failure such as Data Dependency, New Validation Rule added in production etc.
  • Component Missing - Sometimes we miss to add some dependent components like we add the trigger but miss to add its helper class or common utility class used in it.
  • Object or Field Missing in Component - Sometimes we miss to add new object and fields being created and try to move class or other components using them in that case deployment fails.
---------------------------------------------------

Deploy with Change Sets from Sandbox to Production


Change sets make deploying changes easier.
  • Change sets represent sets of customizations in your org (or metadata components) that you can deploy to a connected org. Use change sets as a point-and-click tool to migrate your customizations.
  • There’s no need to download files to a local file system. Other deployment methods require you to work with local files.
  • The change set tool helps you discover and include dependent components. For example, a new custom field can’t be migrated if the custom object it belongs to doesn’t exist in the target org.
  • You define the set of components once. You can reuse the same set of components for another deployment by cloning the change set. Cloning change sets is helpful during the iterative phases of a project.

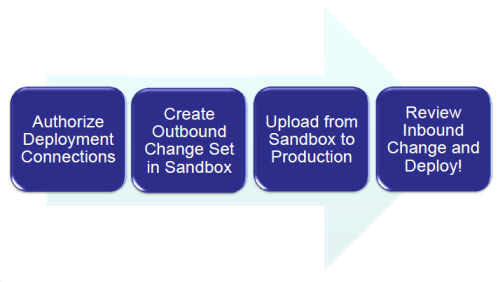
Deploying with change sets involves the following steps.
change set workflow

Authorize a Deployment Connection

Before you can receive change sets from a sandbox or other organization, authorize a deployment connection in the organization that receives the changes.
  1. Log into the organization that’ll receive inbound change sets. Usually this is the production organization associated with your sandbox.
  2. From Setup, enter Deployment in the Quick Find box, then select Deployment Settings.
  3. Click Edit next to the organization from which you want to receive outbound change sets. Usually this is your sandbox.
  4. Select Allow Inbound Changes and click Save.

Create and Upload an Outbound Change Set

Typically, you create an outbound change set in a sandbox organization and deploy it to production. But depending on your development lifecycle, you might choose to migrate changes in either direction between related organizations.
  1. From Setup, enter Outbound Change Sets in the Quick Find box, then select Outbound Change Sets.
  2. Click New.
  3. Enter a name for your change set and click Save.
  4. In the Change Set Components section, click Add.
  5. Choose the type of component (for example, Custom Object or Custom Field), the components you want to add, and click Add To Change Set.
    If you are experimenting with a test custom object and custom field, try adding just one of them to the change set first.
  6. Click View/Add Dependencies to see whether the components you’ve added to the change set are dependent on other customizations.
    In the case of the test custom object and custom field, the related component and page layout will both be listed.
  7. Select the dependent components you want to add and click Add To Change Set.
  8. Click Upload and choose your target organization.
    The outbound change set detail page displays a message and you get an email notification when the upload is complete.
Now log into the target organization, where you can see the inbound change set.

Validate an Inbound Change Set

Validating a change set allows you to see the success or failure messages without committing the changes.
  1. From Setup, enter Inbound Change Sets in the Quick Find box, then select Inbound Change Sets.
  2. Click the name of a change set.
  3. Click Validate.
  4. After the validation completes, click View Results.
    If you receive any error messages, resolve them before you deploy. The most common causes of errors are dependent components that aren’t included in the change set and Apex test failures.

Deploy an Inbound Change Set

Deploying a change set commits the changes it contains to the target organization.
  1. From Setup, enter Inbound Change Sets in the Quick Find box, then select Inbound Change Sets.
  2. In the Change Sets Awaiting Deployment list, click the name of the change set you want to deploy.
Click Deploy.

  • A change set is deployed in a single transaction. If the deployment is unable to complete for any reason, the entire transaction is rolled back. After a deployment completes successfully, all changes are committed to your org and the deployment can’t be rolled back.
  • Change sets limited to 2500 components and 400 MB
  • Change sets are limited to 2500 components and a total file size of 400 MB. If your change set exceeds either of these limits, you can create separate change sets for email templates, dashboards, and reports. These components are often the most numerous and have fewer dependencies.
  • Deleting and renaming components
  • You can't use change sets to delete or rename components. To delete components, use the Web interface on the target organization. To rename a component, first delete the component on the target organization and then upload the new component in a change set.

Disadvantages of change sets:
  • Lookup filter, labels, new picklist values, custom setting & labels are not available for deployments.
  • When creating new profiles first have to create a new profile (created in prod) and than add it to change set and avoid issues on profile based field dependency and page layout assignments.
  • Time based workflow trigger actions cannot be migrated.
  • When migrating workflows, you need to manually select the workflow rule and its actions separately.
  • No option of refreshing the change sets tool.
  • Not all metadata is supported in the metadata API which means some manual changes may need to be made in the production org.
  • To enable the distributed administrator to the upload a change set, you need to give them full rights in that sandbox, including the ability to manage users or modify all data.

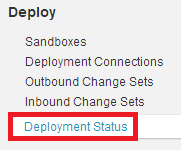
How to find the deployment status in Salesforce? 


Note: that this page shows deployments started via the deploy() metadata API, which includes Force.com IDE, Force.com Migration Tool, but not change sets.


How Deploy Salesforce Profiles using Change Set?

Is it possible to deploy Profile using Change Set?

My experience in deploying Salesforce Profile using Change Set is very challenging (even using Force.com IDE). As of current Salesforce release (Winter '14), this feature is still very primitive, a few areas still not deployed properly and require manual configuration in Target instance:
  • Standard Object Layouts
  • Custom Object Layouts
  • Field-Level Security
  • Custom App Settings
  • Tab Settings
  • Record Type Settings
  • Standard Object Permissions
  • Custom Object Permissions
  • Apex Class Access
  • Visualforce Page Access

Below items will always deploy properly (overwrite target profile) when you add User Profile in 'Profile Settings For Included Components' :
  • Administrative Permissions
  • General User Permissions
  • Login Hours
  • Login IP Ranges
As profile is not Change Set Components, it will not allow you to Upload a Change Set. So, if you want to deploy just items related to 4 items above related to profiles, the workaround is to add any component to the change set, such as: custom field or others.

If you have a profile has been deleted in Target instance, and you deploy Change Set with that profile, deleted profile will be restored with all permissions before it is deleted.


For list of items in top portion above, if there is a Component Type for it, you can deploy them by adding into Component Type with Profile Settings For Included Components.

Migration using ANT in Salesforce

Force.com migration tool(based on JAVA), is used to deploy the Metadata from one organization to other organization or we can use it to retrieve the metadata from one organization and then make some changes locally and then deploy that metadata again to the same organization. We can also migrate the metadata using Change sets but there are some extra features provided in this ANT migration tool:
  • The main advantage of this tool is, that it gets the metadata in form of XML files from your server and downloads it locally on your computer. Thus you can make changes in those XML files locally and again deploy the changes to any server instance, any target org that you want.
  • It allows you to deploy the same metadata any number of times to any of your server, as you have downloaded the metadata in form of XML files, you can deploy them again and again.
  • Change set does not allow you to delete any metadata component from target org. But using ANT migration tool you can delete the components from target org. This is done using destructiveChanges.xml file.
  • Some components are not supported to be migrated using change sets but you can migrate them using ANT migration tool.
  • It can also be run from command prompt using some specific commands for calling APIs.
  • You can also automate your migration process leveraging the capabilities of command prompt .bat files and XML structure of source files.
This tool works with the help of some XML files that we create in order to use this tool. In those XML files, we provide information about our server ( like credentials, login URL, and some other attributes as well) , information about the operation that we want to perform (these are called targets, like retrieve or deploy, file is build.xml), then information about the components that you want to retrieve or deploy(package.xml).
Below is one basic example. Here we will first retrieve the components from source org and then will deploy those components to the target org. Here is the folder that we have initially. We have build.xml and build.properties file here and one folder named “unpackaged” in which we have our package.xml. This package.xml file contains the list of components to be retrieved from source org.
Folder Structure ANT Migration
Below are the details of each file that we have in the current folder structure.
  • Build.properties : We provide the information about our instance on which we want to perform the operation (deploy or retrieve or any other possible operation). Below is the sample. Here in this file we have only enabled the username and password for source org as we will first retrieve the components from source org and build.xml file will use these credentials. But while deploying those components to target org , we’ll have to changes these credentials info to target org’s credentials, so that in the next target that we run from command prompt to deploy the components, the build.xml file will use the target org’s credentials for deployment of components.This is the file that is referred in the next file which is build.xml. All the lines in the below code that starts with # are considered as comments.
1
2
3
4
5
6
7
8
9
10
11
12
13
14
15
16
# build.properties
# Specify the login credentials for the desired Salesforce organization, and if you have IP restrictions then you have to append your security token with the password.
sf.username = sourceorguser@abc.com
sf.password = testuser123
#sf.pkgName = Insert comma separated package names to be retrieved
# Use 'https://login.salesforce.com' for production or developer edition (the default if not specified).
# Use 'https://test.salesforce.com for sandbox.
sf.maxPoll = 20
# If your network requires an HTTP proxy, see http://ant.apache.org/manual/proxy.html for configuration.
  • Build.xml : Here we provide the actions or we can say the operation that we want to perform ( either retrive or deploy or any other possible operation). These tags are called targets also. So, user can run these targets one by one and complete the task in sequential manner as he/she wants. In the below example we have one retrieve target and one deploy target. Every target has some name which we’ll use when calling these targets from command prompt. This file refers build.properties file where we have mentioned all the info required in this file(like username, password, serverurl)
1
2
3
4
5
6
7
8
9
10
11
12
13
14
15
16
17
18
19
20
21
22
<project name="Sample usage of Salesforce Ant tasks" default="test" basedir="." xmlns:sf="antlib:com.salesforce">
<property file="build.properties"/>
 <property environment="env"/>
<!-- Retrieve an unpackaged set of metadata from your org -->
 <!-- The file unpackaged/package.xml lists what is to be retrieved -->
 <target name="retrieveUnpackaged">
 <!-- The below tag creates a new folder in your directory structure, if the folder with the same name does not exist, otherwise uses the previous folder itself -->
 <mkdir dir="retrieveUnpackaged"/>
 <!-- sf:retrieve retrieves the contents into another directory. we refer the username, password, serverurl, maxPoll from build.properties file that is present -->
 <!-- In "retrieveTarget" attribute we mention the path of the folder where we want to retrieve the components -->
 <!-- In "unpackaged" attribute we mention the path of the folder where we have the package.xml file that contains the name of the components to be retrieved -->
 <sf:retrieve username="${sf.username}" password="${sf.password}" serverurl="${sf.serverurl}" maxPoll="${sf.maxPoll}" retrieveTarget="retrieveUnpackaged" unpackaged="unpackaged/package.xml"/>
 </target>
 <!-- Deploy the unpackaged set of metadata retrieved with retrieveUnpackaged -->
 <target name="deployUnpackaged">
 <sf:deploy username="${sf.username}" password="${sf.password}" serverurl="${sf.serverurl}" maxPoll="${sf.maxPoll}" deployRoot="retrieveUnpackaged"/>
</project>
  • Package.xml : This is the last xml file that we need. We have to mention the API name of components that we want to retrieve from source org. And the same xml can be used while deploying those components to target org.
1
2
3
4
5
6
7
8
9
10
11
12
13
14
15
16
17
18
19
20
<!--?xml version="1.0" encoding="UTF-8"?-->
<?xml version="1.0" encoding="UTF-8"?>
 <types>
 <members>FirstCustomController</members>
 <members>Utilities</members>
 <name>ApexClass</name>
 </types>
 <types>
 <members>Test_Page</members>
 <name>ApexPage</name>
 </types>
 <types>
 <members>CustomObject__c</members>
 <members>Account</members>
 <name>CustomObject</name>
 </types>
 <version>29.0</version>
</Package>
After we have all these three files ready, we need to go to the command prompt and go to the same folder location where we have the folder structure as shown above ( where we have build.xml file).
Run the command ant retrieveUnpackaged on the command prompt.
This has to be the name of the target that you want to run. So in the first step we have run a retrieve command in retrieveUnpackaged target. After successfully running this target our directory structure will be like below. As in the target we ran right now, we mentioned that system should create new folder with the name retrieveUnpackaged that will contain all the retrieved components with the corresponding package.xml file as well.
Folder Structure after retrieve
Now we have all the components retrieved in the retrieveUnpackaged folder. Now we just need to run another target in our build.xmltarget that issues a deploy command.
Before running the below command you should modify your build.properties file to contain the username and password of the target org.
Run the command ant deployUnpackaged on the command prompt. You will end up deploying all the components present in the folder retrieveUnpackaged to the target org.
Before starting using migration tool, you need to do some set-up on your machine in order to get the commands
executed from command prompt. So, first of all you need to install the JAVA and Force.com migration tool on your system. Below are the steps to have these things done:
  1. Download ANT from http://ant.apache.org/bindownload.cgi
  2. Extract the downloaded zip file somewhere like C:\apache-ant-1.9.4-bin\apache-ant-1.9.4
  3. Set this path in system variables as ANT_HOME.
  4. If PATH system variable already exists then add %ANT_HOME% to your path variable, else add new PATH variable and keep this value.
  5. Also create a JAVA_HOME environment variable and set the value to the location of your JDK.
  6. Go to command prompt and type ant -v. If it shows that ‘Apache Ant Version compiled’ then that means we are good to go.
  7. Till here you have downloaded and configured the required steps for ANT. Now you have to download the Force.com migration tool from your salesforce org ( it can be any org ). Go to Your Name > Setup > Develop > Tools.
  8. Click the “Force.com Migration Tool” link to download a zip file. Inside this zip file you can find the ant-salesforce.jar file and some sample configuration files.
  9. Copy the jar file mentioned above and paste it into the lib folder of your ant installation direcotry ‘C:\apache-ant-1.9.4-bin\apache-ant-1.9.4\lib‘.
  10. Now, you are ready to use ANT with force.com migration tool. You can now deploy or retrieve your salesforce.com Metadata using ANT and command prompt.


For more information on how to deploy GoTo Force.com Migration Tool Guide


Complete Salesforce Deployment Guide using Ant Migration Tool


Following are the many tools available for Salesforce deployment like
  1. Change sets (From Salesforce site)
  2. Eclipse (Using “Deploy to force.com server” option in Eclipse)
  3. ANT (Java based tool)
We are going to discuss the ANT based migration, step by step:
Prerequisite:
JDK 1.5 or above
Step 1:
Download ANT distribution from – “http://ant.apache.org/bindownload.cgi
Step 2:
Set Environment variable “ANT_HOME“. The path should be of parent folder of “bin”. Also add the “bin” folder to your path.
Step 3:
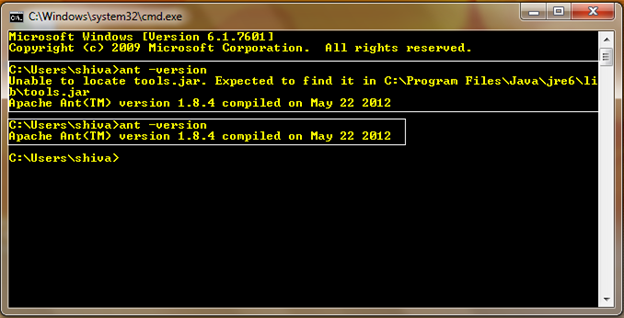
Check whether ANT is installed or not properly by running command “ant -version“. It might be possible that you receive message something like unable to find tools.jar. You can copy this jar from “JDK_HOME/lib/tools.jar” to “JRE/lib” folder.


Salesforce Get ANT version

In above screen you can see that before copying tools.jar I was getting warning.
Step 4:
Login to salesforce and navigate to “Your Name |Setup | Develop | Tools” and download “Force.com Migration tool”.
Unzip the downloaded file to the directory of your choice. Copy the “ant-salesforce.jar” file from the unzipped file into the ant lib directory.
To start with deployment using ANT, we will need “build.xml” and “build.properties” file. As there is no need of “build.properties” however its good to have it so that the configuration related settings are in different file. You can copy both files from “sample” folder of unzipped content from salesforce. Following is the structure of “build.properties” file.
1# build.properties
2# Specify the login credentials for the desired Salesforce organization
3sf.username = &lt;SFDCUserName&gt;
4sf.password = &lt;SFDCPasswrd&gt;
5#sf.pkgName = &lt;Insert comma separated package names to be retrieved&gt;
6#sf.zipFile = &lt;Insert path of the zipfile to be retrieved&gt;
7#sf.metadataType = &lt;Insert metadata type name for which listMetadata or bulkRetrieve operations are to be performed&gt;
8# Use 'https://login.salesforce.com' for production or developer edition (the default if not specified).
9# Use 'https://test.salesforce.com for sandbox.
10sf.serverurl = https://test.salesforce.com
Step 5:
Copy all folders with source code from source organization using eclipse. Lets say the root folder name is “test1”.
Create “build.properties” from above code snippet or copy it from unzipped folder. Now create “build.xml” needed by ANT. Following is the example of build.xml file:
1<project name="Shivasoft ANT Tutorial" default="deployCode" basedir="."xmlns:sf="antlib:com.salesforce">
2    <property file="build.properties"/>
3    <property environment="env"/>
4    <!-- Shows deploying code &amp; running tests for code in directory -->
5    <target name="deployCode" depends="proxy">
6      <sf:deploy username="${sf.username}" password="${sf.password}" serverurl="${sf.serverurl}"deployRoot="test1">
7        <runTest>TestClassName</runTest>
8      </sf:deploy>
9    </target>
10    <!-- Shows removing code; only succeeds if done after deployCode -->
11    <target name="undeployCode">
12      <sf:deploy username="${sf.username}" password="${sf.password}" serverurl="${sf.serverurl}"deployRoot="removecodepkg"/>
13    </target>
14    <target name="proxy">
15        <property name="proxy.host" value=" ProxyURL " />
16        <property name="proxy.port" value="1234" />
17        <property name="proxy.user" value="UserName" />
18        <property name="proxy.pwd" value="Password" />
19        <setproxy proxyhost="${proxy.host}" proxyport="${proxy.port}" proxyuser="${proxy.user}"proxypassword="${proxy.pwd}" />
20    </target>
21</project>
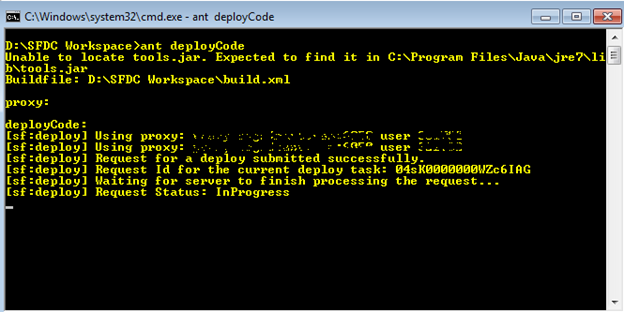
Attribute “deployRoot” means the root folder from which the code should be copied and tag <runTest> means the testclasses which should run after the deployment. At last, go to the folder “test1” from command line and run command “ant deployCode”.


Salesforce Migration using-ANT

Checking the status of the task:
To know the status of task you can run command:
Ant targetName -Dsf.asyncRequestId=requestID
Using Proxy in ANT migration tool:
If your organization uses the proxy then add below target in “build.xml” and specify this target as dependent.
1<target name="proxy">
2        <property name="proxy.host" value=" ProxyURL " />
3        <property name="proxy.port" value="1234" />
4        <property name="proxy.user" value="UserName" />
5        <property name="proxy.pwd" value="Password" />
6        <setproxy proxyhost="${proxy.host}" proxyport="${proxy.port}" proxyuser="${proxy.user}"proxypassword="${proxy.pwd}" />
7    </target>
Retrieve content from Salesforce Organization:
create “package.xml” for the list of component to be retrieved and add following task in “build.xml”.
1<!-- Retrieve an unpackaged set of metadata from your org -->
2<!-- The file unpackaged/package.xml lists what is to be retrieved -->
3<target name="test" depends="proxy">
4  <mkdir dir="retrieveUnpackaged"/>
5  <!-- Retrieve the contents into another directory -->
6  <sf:retrieve username="${sf.username}" password="${sf.password}" serverurl="${sf.serverurl}"retrieveTarget="retrieveUnpackaged" unpackaged="unpackaged/package.xml" unzip="false" />
7</target>
“Unzip” attribute specifies that the code retrieved should be in Zip format or not. By default the value is true means it will not in zip format.
Delete components from Salesforce Organization using “destructiveChanges.xml” :
In some cases, we may want to delete some components like Object or fields from Salesforce Organization. In this case, Only “package.xml” will not work. We need to create “destructiveChanges.xml” file also. Syntax for this file is exactly same as of “package.xml”, except that here we cannot define wildcards. So, to undeploy anything from Salesforce org, we need two xml files – “package.xml” and “destructiveChanges.xml“.
Below is complete code of build.xml, which includes retrieve, Undeploy and Deploy commands.
1<project name="Shivasoft Demo Org" default="deployCode" basedir="." xmlns:sf="antlib:com.salesforce">
2    <!-- Get all settings like Server Path, username and passwords from "build.properties" file -->
3    <property file="build.properties"/>
4    <property environment="env"/>
5    <!-- Sequence 1 - Get All information from Source, Retrieve the contents into Src directory -->
6    <target name="SFDCFetch">
7      <!-- -->
8      <sf:retrieve username="${sf.username}" password="${sf.password}" serverurl="${sf.serverurl}"retrieveTarget="src" unpackaged="package.xml"/>
9    </target>
10
11    <!-- Sequence 3 - Deploy to Target System, Package.xml is present in Src folder -->
12    <target name="deploy">
13      <sf:deploy username="${sf1.username}" password="${sf1.password}" serverurl="${sf.serverurl}"deployroot="Src">
14      </sf:deploy>
15    </target>
16
17    <!-- Sequence 2 - If you want to remove some components, destructiveChanges.xml and Package.xml present in Delete Folder -->
18    <target name="unDeploy">
19      <sf:deploy username="${sf1.username}" password="${sf1.password}" serverurl="${sf.serverurl}"deployroot="Delete">
20      </sf:deploy>
21    </target>
22</project>
Update [03-Apr-2017]
Question : Why Salesforce ANT Migration tool is giving wrong Username, Security token or password error, even when everything is correct ?
Ans : If your password contains “$”, then ANT tool ignores this characters. So, to correct this, we need to add one more “$”.
Question : Why I am getting error like java.lang.OutOfMemoryError: Java heap space while retrieving metadata from Salesforce. 
Ans : It is possible that you are retrieving metadata of some big organization with lots of changes. In this case, Java JVM running on system needs more memory (RAM) in order to process it. It can be done in two ways
1. Before running ANT command, run below command which will set the RAM allocated for JVM to 1GB. If you are not a Windows user, then use export instead of set in below command.
1set ANT_OPTS=-Xmx1g
2. Problem in above solution is that, you would need to execute set command every time before using ANT. For permanent solution, open ant.bat file in bin folder of ANT installation (Same installation folder referred in ANT_HOME). And, at very first line, write below command and save it.
1set ANT_OPTS=-Xmx1g
I hope this article will help newbie to learn ant migration tool.
List of Component Type available in Change Set:

Account Criteria Based Sharing Rule

Account Owner Sharing Rule
Account Territory Owner Sharing Rule
Action (includes object-oriented publisher actions and global publisher actions)
Analytic Snapshot
Apex Class
Apex Sharing Reason
Apex Trigger
App
Approval Process (with some restrictions)
Assignment Rule
Auth. Provider
AutoResponse Rule
Button or Link
Call Center
Campaign Criteria Based Sharing Rule
Campaign Owner Sharing Rule
Case Criteria Based Sharing Rule
Case Owner Sharing Rule
Communities (Zones)
Compact Layout
Contact Criteria Based Sharing Rule
Contact Owner Sharing Rule
Custom Data Type
Custom Field
Custom Label
Custom Object
Custom Object Criteria Sharing Rule
Custom Object Owner Sharing Rule
Custom Report Type
Custom Setting
Dashboard
Document
Email Template
External Data Source
Escalation Rule
Field Set
Flexible Page
Flow
Folder
Group
Home Page Component
Home Page Layout
Letterhead
Language Translation
Lead Criteria Based Sharing Rule
Lead Owner Sharing Rule
List View
Opportunity Criteria Based Sharing Rule
Opportunity Owner Sharing Rule
Page Layout
Permission Set
Post Templates for Approvals in Chatter
Queue
Record Type
Remote Site
Report
Role
S-Control
Send Action
Static resource
Tab
Territory
User Criteria Based Sharing Rule
User Membership Based Sharing Rule
Validation Rule
Visualforce Component
Visualforce Page
Workflow Email Alert
Workflow Field Update
Workflow Outbound Message
Workflow Rule
Workflow Task
Workflow Time Trigger


How to delete a class in production in Salesforce?


How to delete a class in production in Salesforce?

1. Install Force.com IDE in Eclipse.

2. Connect to the Sandbox Instance using the IDE and find the class or trigger that you want to delete.

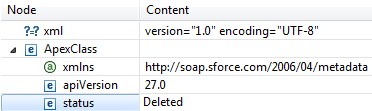
3. Open the matching .xml file change the Status XML tag from "Active" to "Deleted" if you want to remove the trigger or class, or to "Inactive" if you want to disable the trigger.

4. Apex class Status can only be changed to "Active" or "Deleted", not "Inactive".


5. Save the file.

6. Select the two files (Code and XML) using Ctrl-click, then right click on one of them. Select Force.com > Deploy to server.

7. Provide your credentials for the production org and follow the steps.