Tuesday, May 2, 2023

Static, final, this, super keywords in apex

 static

This keyword defines a method/variable that is only initialized once and is associated with an (outer) class, and initialization code. We can call static variables/methods by class name directly. No need of creating an instance of a class.

Static variables are variables that belong to an overall class, not a particular object of a class. Think of a static variable to be like a global variable – its value is shared across your entire org. Any particular object’s properties or values are completely irrelevant when using static.

Static methods, similarly, are methods that act globally and not in the context of a particular object of a class. Being global, static methods only have access to their provided inputs and other static (global) variables.

Example

public class OuterClass {

	// Associated with instance
	public static final Integer MY_INT;
	
	// Initialization code
	static {
	MY_INT = 10;
	}
	
}

final

This keyword is used to define constants and methods that can’t be overridden.

Example

public class myCls {
    static final Integer INT_CONST;
}

this

This keyword represents the current instance of a class, in constructor chaining.

Example

public class Foo {
	
	public Foo(String s) {/* … */}
	
	public foo() {
	
	this('memes repeat'); }
	
}

super

This keyword invokes a constructor on a superclass.

Example

public class AnotherChildClass extends InnerClass {
	AnotherChildClass(String s) {
		super();
		// different constructor, no args
	}
}

return

This keyword returns a value from a method.

Example

public Integer sum() {
    return int_var;
}

transient

This keyword declares instance variables that cannot be saved, and should not be transmitted as part of the view state, in Visualforce controllers and extensions.

Example

transient integer currentValue;

null

This keyword defines a null constant that can be assigned to any variable.

Example

Boolean b = null;

Like other programming languages, there are many other keywords in Apex programming language. We will see those in other posts.

Tuesday, March 8, 2022

LWC Display List of Cases in Table

 HTML : 

<!--

 * @File Name          : LWC_CaseLWCService.cls

 * @Description        : 

 * @Author             : Venkataramana D

 * @Group              : 

 * @Last Modified By   : Venkataramana D

 * @Last Modified On   : 28/FEB/2022, 1:54:34 pm

 * @Modification Log   : 

 * Ver       Date            Author          Modification

 * 1.0    28/FEB/2022   Venkataramana D     Initial Version

-->

<template>

    Testing:

    <lightning-card  variant="Narrow"  title="Case List" icon-name="standard:case">

        <div class="slds-m-around_small">

            <lightning-datatable

                key-field="id"

                data={result}

                show-row-number-column

                hide-checkbox-column

                columns={columnsList}

                onrowaction={handleRowAction}>

            </lightning-datatable>

        </div>

    </lightning-card>

</template>

----------------------------------------------------------------------------------------------------

JS:

import { LightningElement, wire, api, track } from 'lwc';

import fetchCases from '@salesforce/apex/LWC_CaseLWCService.fetchCases';


const columns = [

    { 

        label: 'CaseNumber', fieldName: 'caseUrl', type:'url',

        typeAttributes: {

            label: { 

                fieldName: 'CaseNumber' 

            },

            target : '_blank'

        }

    },

    { 

        label: 'Subject', fieldName: 'subjectUrl', wrapText: true,

        type: 'url',

        typeAttributes: {

            label: { 

                fieldName: 'Subject' 

            },

            target : '_blank'

        }

    },

    { label: 'Status', fieldName: 'Status' },

    {

        label: 'Priority', fieldName: 'Priority',

        cellAttributes:{ 

            iconName: { 

                fieldName: 'priorityIcon' 

            },

            iconPosition: 'left', 

            iconAlternativeText: 'Priority Icon' 

        }

    },

    { 

        label: 'Contact', fieldName: 'ContactUrl', wrapText: true,

        type: 'url',

        typeAttributes: {

            label: { 

                fieldName: 'ContactName' 

            },

            target : '_blank'

        } 

    },

    { 

        label: 'Account', fieldName: 'AccountUrl', wrapText: true,

        type: 'url',

        typeAttributes: {

            label: { 

                fieldName: 'AccountName' 

            },

            target : '_blank'

        } 

    }

];


export default class LWC_CaseDatatable extends LightningElement {


    @api result;

    @track error;


    columnsList = columns;


    connectedCallback(){

        this.getAllCaseDetails();

    }


    getAllCaseDetails(){

        fetchCases()

            .then(data => {

                /* Iterate with Each record and check if the Case is Associated with Account or Contact

                    then get the Name and display into datatable

                */

                /* Prepare the Org Host */

                let baseUrl = 'https://'+location.host+'/';

                data.forEach(caseRec => {

                    caseRec.caseUrl = baseUrl+caseRec.Id;

                    if(caseRec.Subject==null){

                        caseRec.subjectUrl  = null;

                    }else {

                        caseRec.subjectUrl = baseUrl+caseRec.Id;

                    }

                    if(caseRec.ContactId){

                        caseRec.ContactName = caseRec.Contact.Name;

                        /* Prepare Contact Detail Page Url */

                        caseRec.ContactUrl = baseUrl+caseRec.ContactId;

                    }

                    if(caseRec.AccountId){

                        caseRec.AccountName = caseRec.Account.Name;

                        /* Prepare Account Detail Page Url */

                        caseRec.AccountUrl = baseUrl+caseRec.AccountId;

                    }


                    if(caseRec.Priority === 'High'){

                        caseRec.priorityIcon = 'utility:log_a_call';

                    } else if (caseRec.Priority === 'Medium'){

                        caseRec.priorityIcon = 'utility:note';

                    } else if(caseRec.Priority === 'Low'){

                        caseRec.priorityIcon = 'utility:open';

                    }

                });

                this.result = data;

                window.console.log(' data ', data);

                this.error = undefined;

            })

            .catch(error => {

                this.error = error;

                window.console.log(' error ', error);

                this.result = undefined;

            });

    }


    handleRowAction(){


    }

}

-----------------------------------------------------------------------------------------------------

Meta.XML

<?xml version="1.0" encoding="UTF-8"?>

<LightningComponentBundle xmlns="http://soap.sforce.com/2006/04/metadata">

    <apiVersion>52.0</apiVersion>

    <isExposed>true</isExposed>

    <targets>

        <target>lightning__AppPage</target>

        <target>lightning__RecordPage</target>

        <target>lightning__HomePage</target>

      </targets>

</LightningComponentBundle>

-------------------------------------------------------------------------------------------------------

APex Class :

/**

 * @File Name          : CaseLWCService.cls

 * @Description        : 

 * @Author             : Venkataramana D

 * @Group              : 

 * @Last Modified By   : Venkataramana D

 * @Last Modified On   : 28/FEB/2022, 1:54:34 pm

 * @Modification Log   : 

 * Ver       Date            Author          Modification

 * 1.0    28/FEB/2022   Venkataramana D     Initial Version

**/

public with sharing class LWC_CaseLWCService {

    public LWC_CaseLWCService() {


    }


    @AuraEnabled

    public static List<Case> fetchCases(){

        return [SELECT Id, CaseNumber, Subject, Description, AccountId, Account.Name, ContactId,

                Contact.Name, Status, Priority FROM CASE LIMIT 10];

    }

}


Thursday, December 23, 2021

Platform Events And Examples how to create in Salesforce

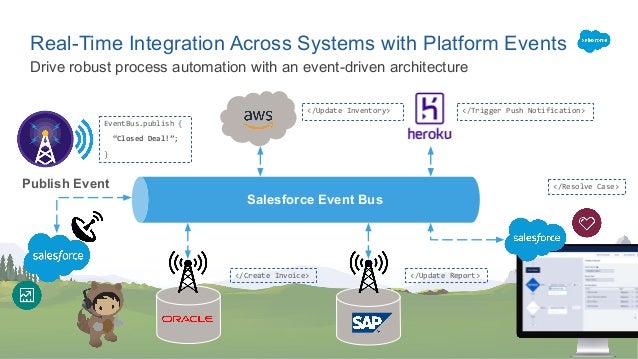
 Platform Event is based on Event-Driven Architecture which enable apps to communicate inside and outside of Salesforce. Platform events are based on the publish/subscribe model and work directly with a message bus which handles the queue of incoming events and processes listening for them. This is built in real time integration patterns in the Salesforce Platform which helps to reduce point-to-point integration


Here is some terminology we should remember :-
  • Event : A change in state that is meaningful in a business process.
  • Event message / Notification : A message that contains data about the event.
  • Event producer : The publisher of an event message over a channel.
  • Channel : A conduit in which an event producer transmits a message. Event consumers subscribe to the channel to receive messages. Also referred to as event bus in Salesforce.
  • Event consumer : A subscriber to a channel that receives messages from the channel.

Understanding of Platform Event

  • SObject like Salesforce Entity
    • Suffixed with __e
    • ReplayId fir replaying specific event
    • Only Checkbox, Date, Date/Time , Number , Text and Text Area field available.
  • Pub / Sub based communication 
    • No Polling required.
  • Heterogeneous playloads
    • Define events with different playloads

Difference between SObject and Platform Events


SObjects__c
Platform_Events__e
DMLs (Insert, Update, Delete)
Publish (Insert only)
SOQL
Streaming API
Triggers
Subscribers
Parallel context execution
Guaranteed order of execution

Considerations :-

  1. Platform event is appended with__e suffix for API name of the event.
  2. You can not query Platform events through SOQL or SOSL.
  3. You can not use Platform in reports, list views, and search. Platform events don’t have an associated tab
  4. Published platform events can’t be rolled back.
  5. All platform event fields are read-only by default
  6. Only after insert Triggers Are Supported
  7. You can access platform events both through API and declaratively
  8. You can control platform events though Profiles and permissions

Publishing / Subscribing Platform Events


Publish Platform Events :


We can publish the platform events in 3 ways:
  1. Publish Events Messaging using APEX.
    List<Order_Shipping__e> orderShippingList = new List<Order_Shipping__e>();
    Order_Shipping__e orderShipping = new Order_Shipping__e( Order_Number__c='12345', status__c=1 );
    orderShippingList.add(orderShipping);

    List<Database.SaveResult> results = EventBus.publish(newsEventList);

    for (Database.SaveResult sr : results) {
        if (sr.isSuccess()) {
            System.debug('Successfully published event.');
        } else {
            for(Database.Error err : sr.getErrors()) {
                System.debug('Error returned: ' + err.getStatusCode() );
            }
        }
    }
  2. Publish Events Messaging using Declarative tools 
    1. Process Builder 
    2. Cloud Flow Designer Tool / Visual Work flow
  3. Publish Events Messaging using Salesforce API from external app.

Subscribing Platform Events :


We can subscribe the platform events with following ways :
  1. Apex Trigger : Write an “after insert” Apex trigger on the event object to subscribe to incoming events.Triggers receive event notifications from various sources—whether they’re published through Apex or APIs.

    Trigger OrderShippingTrigger on Order_Shipping__e (after Insert) {
      
    }
  2. Subscrbe to platform event notification in Lightning components
    1. Lightning web components :  Use the empApi methods in your Lightning web component, import the methods from the lightning/empApi module as follows

      import { subscribe, unsubscribe, onError, setDebugFlag, isEmpEnabled }
          from 'lightning/empApi';
    2. Subscibe in an Aura Component : Use the empApi methods in your Aura component, add the lightning:empApi component inside your custom component and assign an aura:id attribute to it
      <lightning:empApi aura:id="empApi"/>
  3. In an external app, you subscribe to events using CometD as well.
  4. Flow and process builder. Check this post.
Please check below two Apex Hours sessions to learn more about platform event.
  1. Platform Event basics
  2. Overcome Salesforce Governor Limits Using Platform Events
 --------------------------------------------------------------------------------------------------------------------------------------

Introduction: 

Platform Events are used to deliver secure, scalable, and customizable notification within Salesforce or external app. Platform Event is based on Event-Driven Architecture. This is built in real time integration patterns in the Salesforce Platform which helps to reduce point-to-point integration.

Publishing platform event: 

We can publish the platform events in 3 ways:

  1. Publish Events Messaging using APEX.
  2. Publish Events Messaging using Declarative tools (Process Builder or Cloud Flow Designer Tool / Visual Work flow).
  3. Publish Events Messaging using Salesforce API from external app.

Not supported in Platform event: 

  1. The allOrNoneHeader API header is ignored when you publish platform events through the API.
  2. The Apex setSavepoint() and rollback() Database methods aren’t supported with platform events.

Subscription in Platform Event: 

  1. Apex triggers receive event notifications.
  2. write an “after insert” Apex trigger on the event object to subscribe to incoming events.
  3. Triggers receive event notifications from various sources—whether they’re published through Apex or APIs.
  4. Visualforce and Lightning component apps receive events through CometD.
  5. CometD is a scalable HTTP-based event routing bus that uses an AJAX push technology pattern known as Comet.
  6. In an external app, you subscribe to events using CometD as well.

Defining Objects and fields in Platform Events: 

Platform events can be created just like the custom objects. The biggest difference between Platform events and Custom object is suffix name for the api name. In Platform events, its api name suffix with __e where the custom object appends __c suffix to create api name. Unlike with custom objects, we cannot update or delete event record, or view event records in Salesforce User Interface.

Platform Events support only following custom fields type,

  1. Checkbox
  2. Date
  3. Data/Time
  4. Number
  5. Text
  6. Text Area (Long)

ReplayId System Field and Event Retention

  1. Salesforce stores platform events for 24 hours. You can retrieve stored events in API clients but not in Apex.
  2. Each event record contains a field, called ReplayID, that the system populates after the event is published.
  3. Each replay ID is guaranteed to be higher than the ID of the previous event, but not necessarily contiguous for consecutive events.
  4. You can retrieve all stored events, or you can specify the replay ID of an event as the baseline for the retrieved portion of events.

Steps to Create and Publish Platform Events:

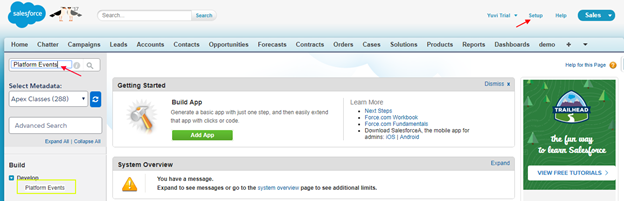
  1. From Setup, Search Platform Events and Click on the Platform Events.
platform events salesforce
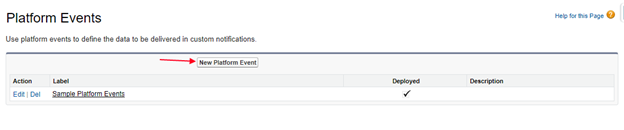
  1. Click on New button to create Platform Events.
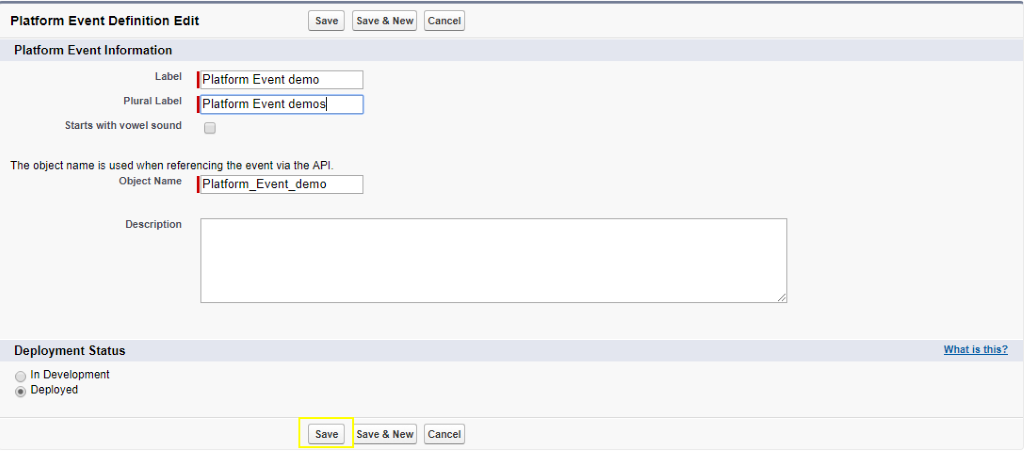
  1. Provide the name for the Platform Events.
platform events salesforce
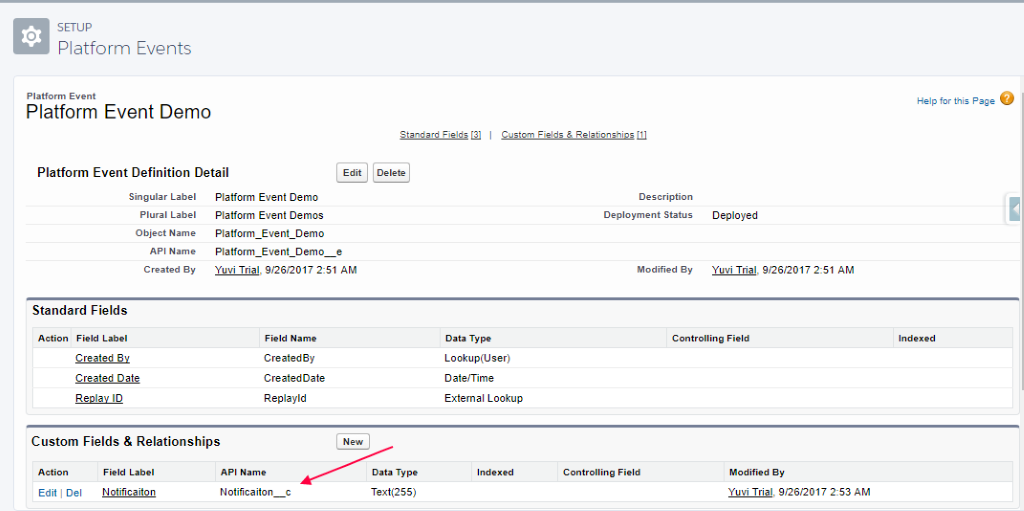
  1. Create a custom field to show the Notification from this field.
platform events salesforce
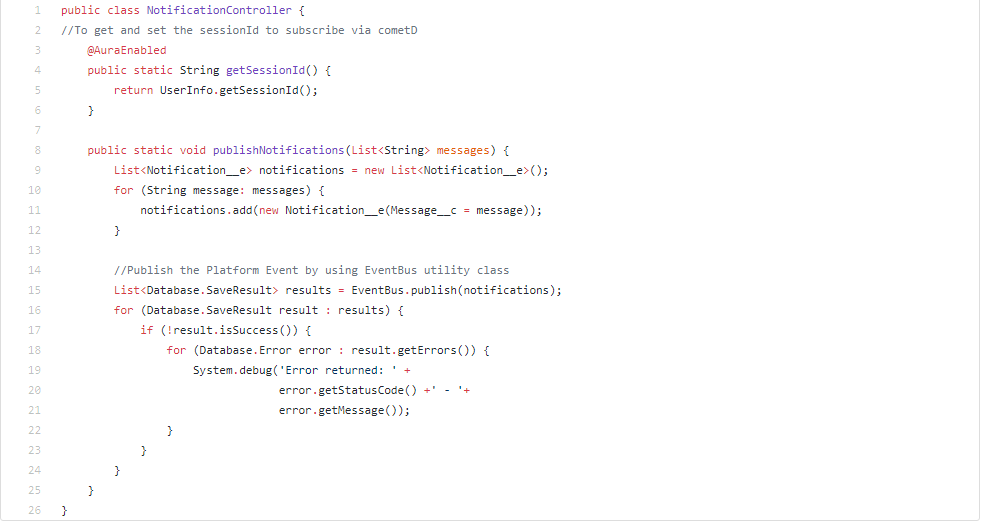
  1. Create an Apex Class to publish the Platform Event

NotificationController.cls

platform events salesforce
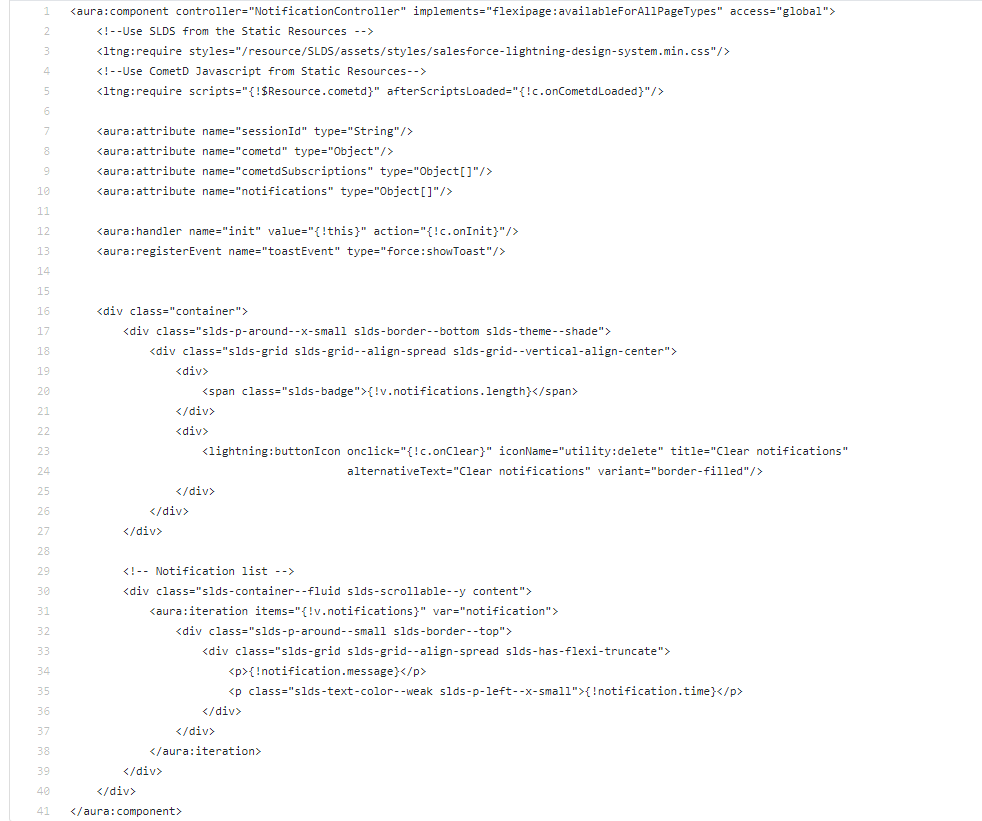
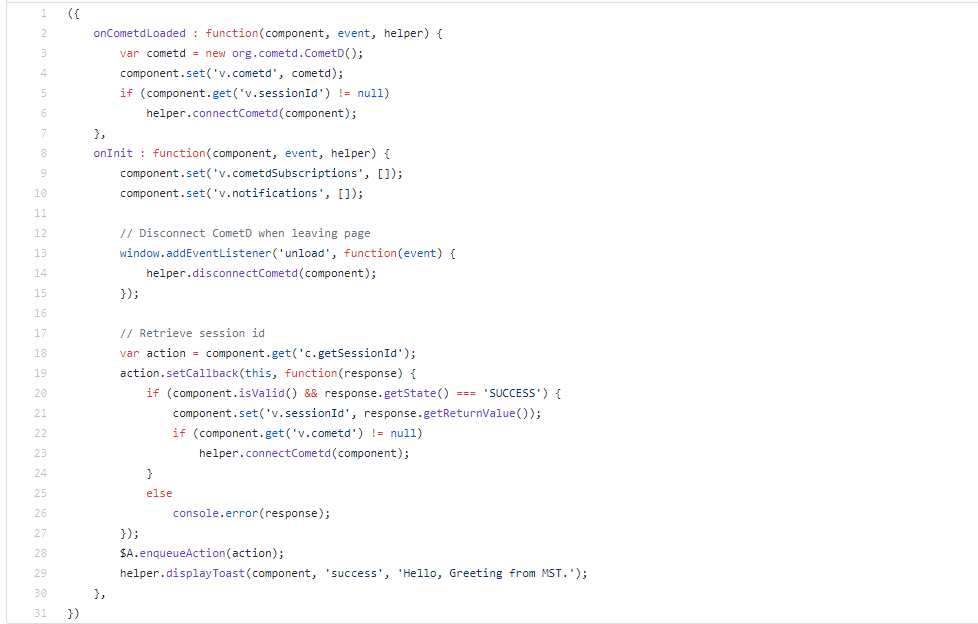
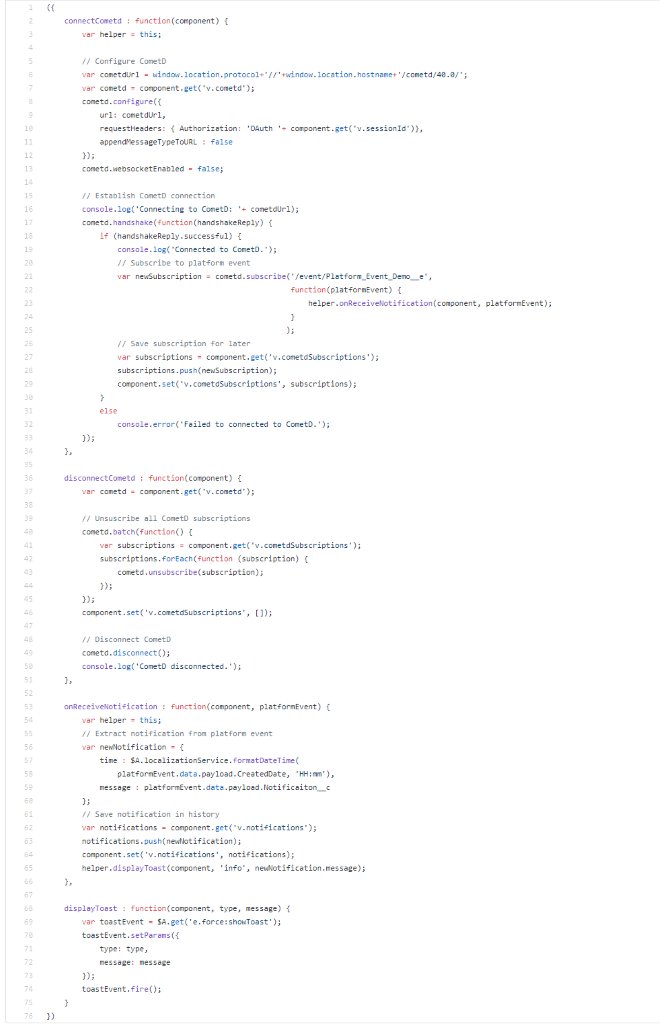
  1. Create a Lightning Component to subscribe the Platform Event through cometd JavaScript client and get the real-time notification through this component.

helpNotification.cmp:

platform events salesforce

helpNotificationController.js

platform events salesforce

helpNotificationHelper.js

platform events salesforce
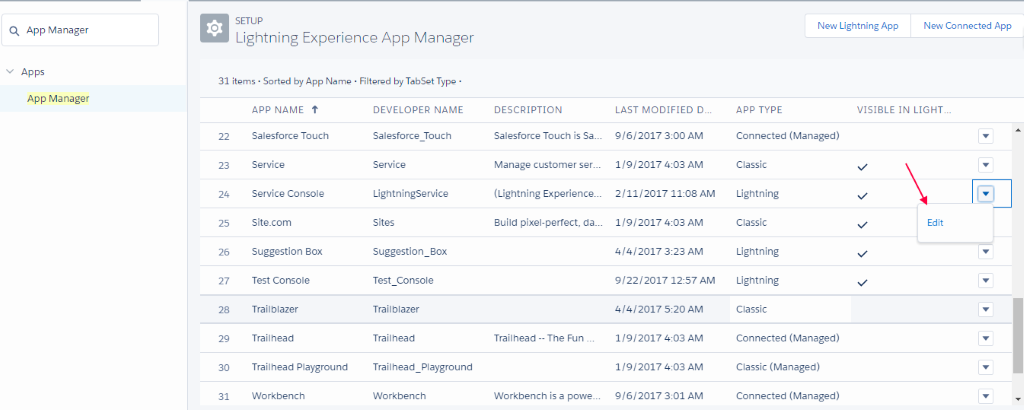
  1. From Setup > App Manager > Click Edit on Service Console App.
platform events salesforce
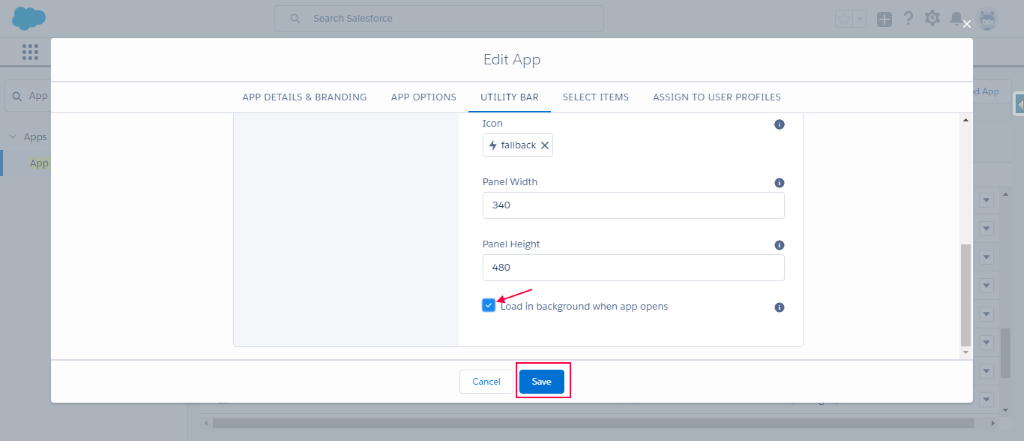
  1. Click on Utility Bar Tab. Click on Add button and choose helpNotification component to add lightning component to Service Console App.

v

  1. Provide the component name as Help and check Load in background apps open option.
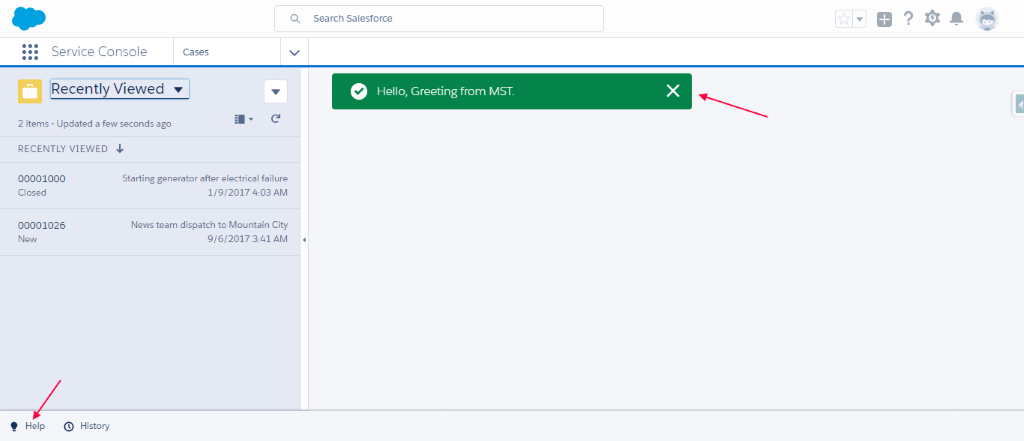
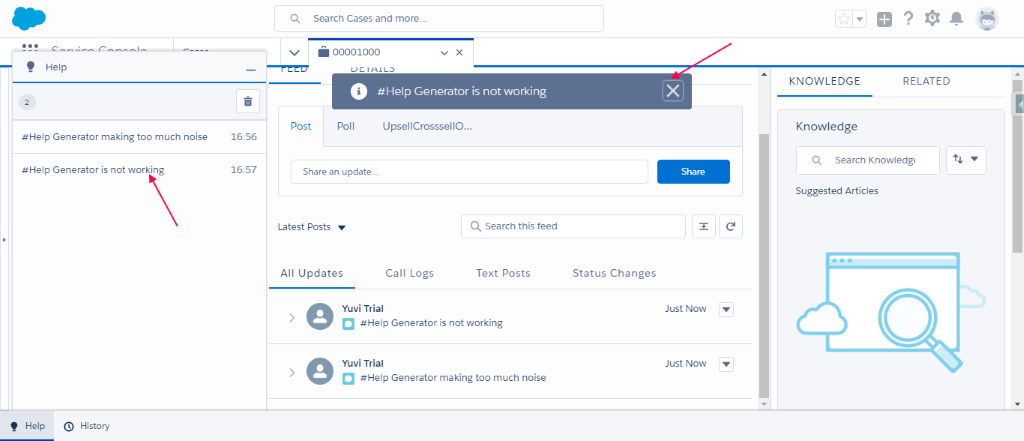
  1. Go to the Service Console App. You will see the notification as shown below and Help utility bar.
platform events salesforce
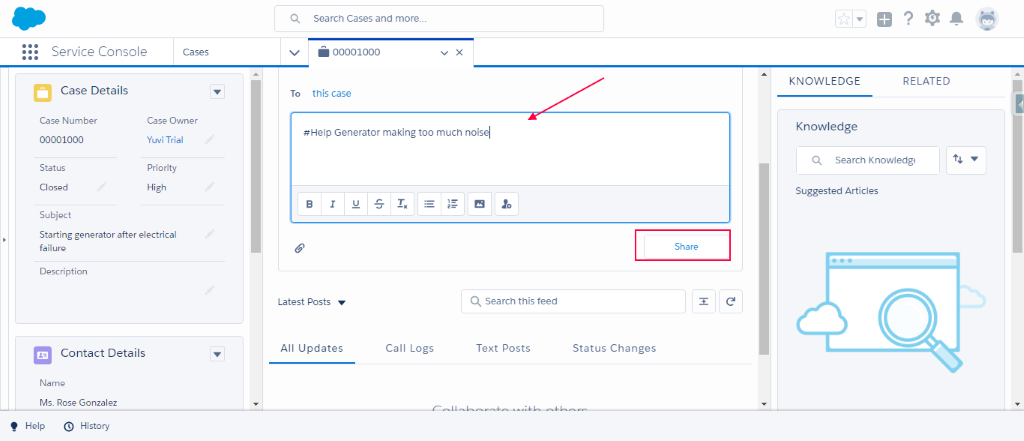
  1. Click on any case record. In Chatter feed, Add #Help with your custom message in chatter feed.
platform events salesforce
  1. Upon posting the message with #Help, it will show the notification on which the platform events have been published. Also, you will get notification in Help Utility bar.
platform events salesforce

Conclusion: 

It is no longer applications are pulling out from multiple endpoints and polling to retrieve the data. We can get the data by subscribing to the platform event. It will help create 360-degree customer experience to get the information when the data changes.

----------------------------------------------------------------------------------------------------------------------

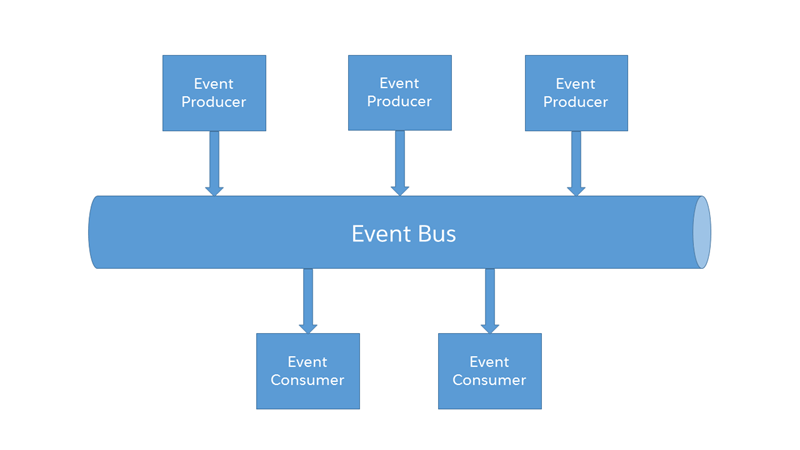
Salesforce event-driven architecture is consisting of

  • event producers
  • event consumers
  • channels. 

Platform events simplify the process of communicating changes and responding to events. Publishers and subscribers communicate with each other through events. One or more subscribers can listen to the same event and carry out actions.

With an Event-driven architecture each service publishes an event whenever it updates or creates a data. Other services can subscribe to events. It enables an application to maintain data consistency across multiple services without using distributed transactions. 

TrailheaDX 2019 : Explore New Frontiers with High Volume Platform Ev…

Let us take an example of order management. When the Order management app creates an Order in a pending state and publishes an Order Created event. The Customer Service receives the event and attempts to process an Order. It then publishes an Order Update event. Then Order Update Service receives the event from the changes the state of the order to either approved or canceled or fulfilled. The following  diagram show the event driven architect

An Introduction to Salesforce Platform Events - SFDC Beginner

Terminology

Event

A change in state that is meaningful in a business process. For example, a placement  of an order is a meaningful event because the order fulfillment center requires notification to process the order.

Event Notifier

A message that contains data about the event. Also known as an event notification.

Event producer

The publisher of an event message over a channel.

Channel

A conduit in which an event producer transmits a message. Event consumers subscribe to the channel to receive messages.

Event consumer

A subscriber to a channel that receives messages from the channel. A change in state that is meaningful in a business process.

But when you overlook at Platform events it makes similar to Streaming API and most of the futures including the replayID and durability but below makes the difference between with streaming API.

  • Platform  events are special kinds of entity similar to custom object
  • You can publish and consume platform events by using Apex or a REST API or SOAP API.
  • Platform events integrate with the Salesforce platform through Apex triggers. Triggers are the event consumers on the Salesforce platform that listen to event messages.
  •  Unlike custom objects, you can’t update or delete event records. You also can’t view event records in the Salesforce user interface, and platform events don’t have page layouts. When you delete a platform event definition, it’s permanently deleted.
  • Platform events may be published using declarative tools (Process Builder)
  • platform events can also be subscribed to using APEX  or decoratively process builder      and flows

Publishing and subscribing Platform events

Publishing and subscribing the platform event are more flexible. You can publish event messages from a Force.com app or an external app using Apex or Salesforce APIs and you can subscribe from the Salesforce or external apps or use long polling with cometD as well.

Define Plat form Event

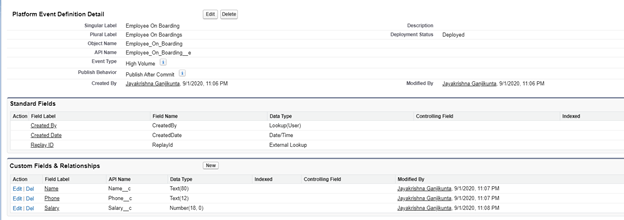
Define platform event similar like custom object, go to setup –> develope –> Platform events –> create new platform events as shown below.

Publish Platform events

1.a. Publish Using Apex

A trigger processes platform event notification sequentially in the order they’re received and trigger runs in its own process asynchronously and isn’t part of the transaction that published the event. Salesforce has a special class to publish the platform events EventBus which is having methods publish method. once the event is published you can consume the events from the channel

trigger PlatformEventPublish on Account (after insert , after update ) {
    
    If(trigger.isAfter && trigger.isUpdate){
        List<Employee_On_boarding__e> publishEvents = new List<Employee_On_boarding__e>();
        for(Account a : Trigger.new){
            Employee_On_boarding__e eve = new Employee_On_boarding__e();
            eve.Name__c = a.Name ;
            eve.Phone__c = a.Phone ;
            eve.Salary__c = a.AnnualRevenue ;
            publishEvents.add(eve);            
        }
        if(publishEvents.size()>0){
            EventBus.publish(publishEvents);
        }
        
    }
    
}

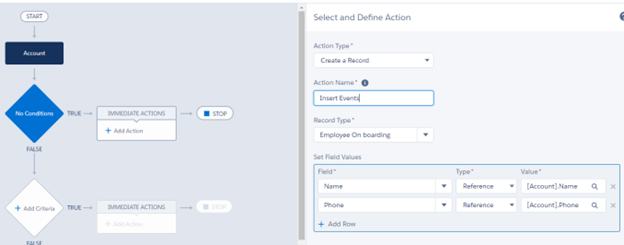
1.b. Publish Using Process Builder

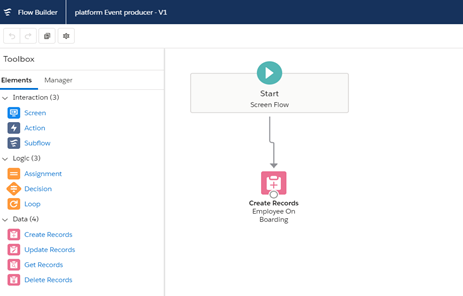
1.c. Publish Events by Flow

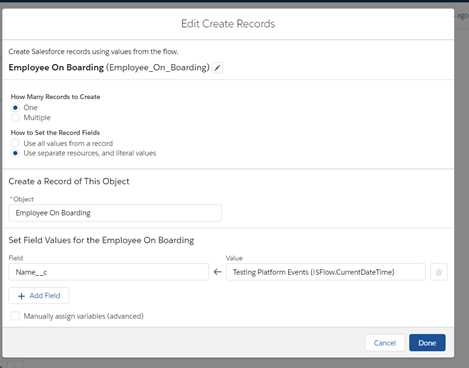
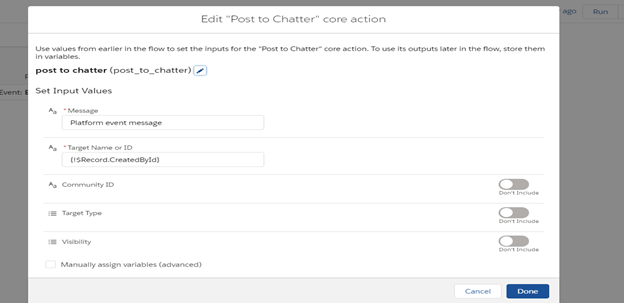
Create flow: 1(platform Event producer)

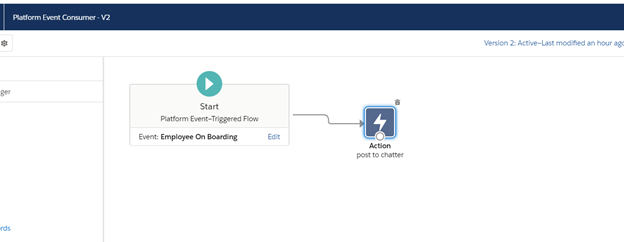
Create flow:2(Platform Event Consumer)

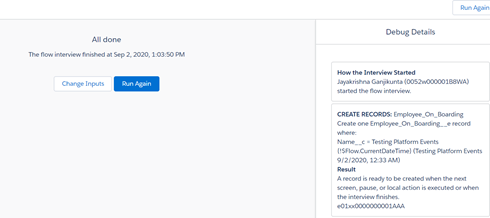
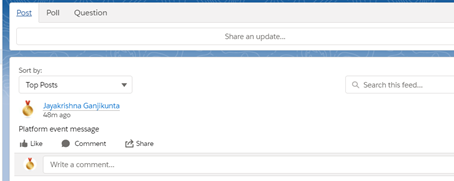
Run/Debug Flow:1(platform Event producer) and you will send post in chatter.

Result:

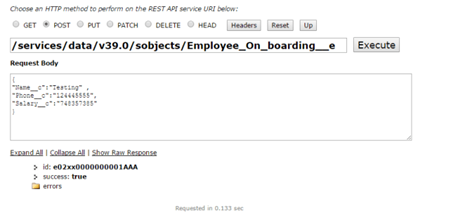
1.d. Publish Events by Using API (Using workbench)

Subscribe for Platform events

We can subscribe to the platform events from the Platform events object trigger which is created in step 1. Here is the sample trigger show how you can handle the subscribed events. create new accounts from the platform event but you can implement your own business logic to update the data.

Using Trigger:

trigger OnBoardingTrigger on Employee_On_boarding__e (after insert) {
    List<Account> acc = new List<Account>();
    for(Employee_On_boarding__e oBording :trigger.new){
        acc.add(new Account(Name =oBording.Name__c , Phone =oBording.Phone__c , AnnualRevenue = oBording.Salary__c));
    }
    if(acc.size() >0){
        insert acc ;
    }
}

Below is simple visual force page that consumes the platform events which you published. This page is built on cometD.

CometD is a set of library to write web applications that perform messaging over the web.Whenever you need to write applications where clients need to react to server-side events, then CometD is a very good choice. Think chat applications, online games, monitoring consoles, collaboration tools, stock trading, etc. 

you can consume the platform events by using this  URI /event/Employee_On_boarding__e and the Complete code is here below.

<apex:page standardStylesheets="false" showHeader="false" sidebar="false">
    <div id="content"> 
    </div>
    <apex:includeScript value="{!$Resource.cometd}"/>
    <apex:includeScript value="{!$Resource.jquery}"/>
    <apex:includeScript value="{!$Resource.json2}"/>
    <apex:includeScript value="{!$Resource.jquery_cometd}"/>
   
    <script type="text/javascript">
    (function($){
        $(document).ready(function() {
            $.cometd.configure({
                url: window.location.protocol+'//'+window.location.hostname+ (null != window.location.port ? (':'+window.location.port) : '') +'/cometd/40.0/',
                requestHeaders: { Authorization: 'OAuth {!$Api.Session_ID}'}
            });
            $.cometd.handshake();
            $.cometd.addListener('/meta/handshake', function(message) {
                $.cometd.subscribe('/event/Employee_On_boarding__e', function(message) {
                    var div = document.getElementById('content');
                                    div.innerHTML = div.innerHTML + '<p>Notification </p><br/>' +
                        'Streaming Message ' + JSON.stringify(message) + '</p><br>';
                });
            })
        });
    })(jQuery)
    </script>
</apex:page>