Test Salesforce API by Postman Rest Client | Postman and Salesforce | Calling APEX Rest service using Postman| OAuth 2.0
Force.com platform support powerful web services API for interaction with external app and salesforce.com . For secured interaction with third party app, Salesforce enforces authentication process.

Above image is picked from here.
If you want to configure the same the help of recording. Click here for recording.
Step 1) Connected App for OAuth
To perform OAuth in salesforce, you must create Connected App in salesforce
Follow below step to create connected App.
1) Click on Setup->Create->App

2) Then from above screen click on Connect Apps then New button. Then add all required information like below
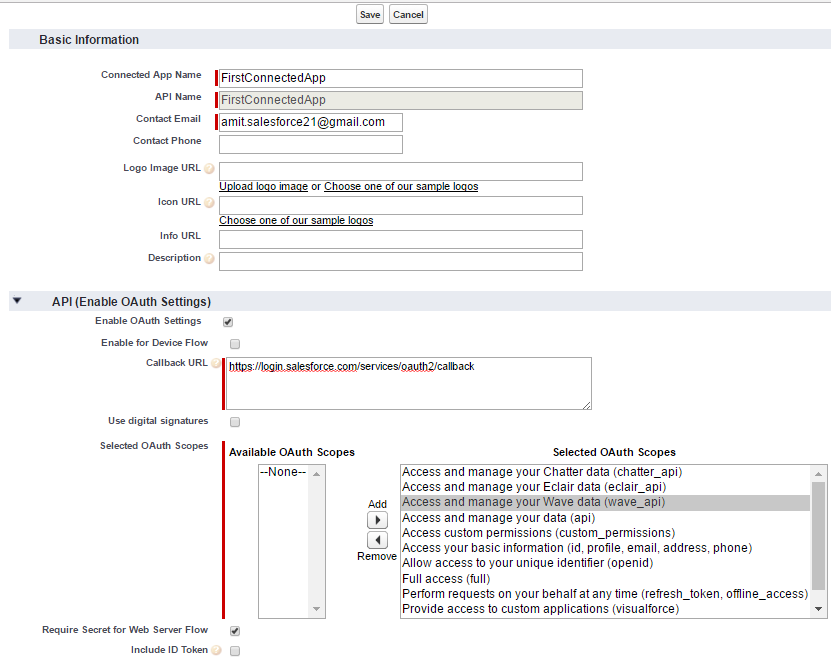
3) Now After creating connected App we have consumer key and consumer secret

Step 2) Create a REST API in salesforce.
Please check below post for REST API
1) Learn Rest API in salesforce | How to learn Rest API | Rest API in salesforce
2) Rest API in Salesforce | Execute Rest API on workbench | Test class for Rest API
Sample code to Start
@RestResource(urlMapping='/api/Account/*')
global with sharing class MyFirstRestAPIClass
{
@HttpGet
global static Account doGet()
{
RestRequest req = RestContext.request;
RestResponse res = RestContext.response;
String AccNumber = req.requestURI.substring(req.requestURI.lastIndexOf('/')+1);
Account result = [SELECT Id, Name, Phone, Website FROM Account WHERE AccountNumber = :AccNumber ];
return result;
}
@HttpDelete
global static void doDelete()
{
RestRequest req = RestContext.request;
RestResponse res = RestContext.response;
String AccNumber = req.requestURI.substring(req.requestURI.lastIndexOf('/')+1);
Account result = [SELECT Id, Name, Phone, Website FROM Account WHERE AccountNumber = :AccNumber ];
delete result;
}
@HttpPost
global static String doPost(String name,String phone,String AccountNumber )
{
Account acc = new Account();
acc.name= name;
acc.phone=phone;
acc.AccountNumber =AccountNumber ;
insert acc;
return acc.id;
}
}
global with sharing class MyFirstRestAPIClass
{
@HttpGet
global static Account doGet()
{
RestRequest req = RestContext.request;
RestResponse res = RestContext.response;
String AccNumber = req.requestURI.substring(req.requestURI.lastIndexOf('/')+1);
Account result = [SELECT Id, Name, Phone, Website FROM Account WHERE AccountNumber = :AccNumber ];
return result;
}
@HttpDelete
global static void doDelete()
{
RestRequest req = RestContext.request;
RestResponse res = RestContext.response;
String AccNumber = req.requestURI.substring(req.requestURI.lastIndexOf('/')+1);
Account result = [SELECT Id, Name, Phone, Website FROM Account WHERE AccountNumber = :AccNumber ];
delete result;
}
@HttpPost
global static String doPost(String name,String phone,String AccountNumber )
{
Account acc = new Account();
acc.name= name;
acc.phone=phone;
acc.AccountNumber =AccountNumber ;
insert acc;
return acc.id;
}
}
Step 3) Get Access Token by POSTMAN
3.1) Install the postman from here.
Download URL :- https://www.getpostman.com/
3.2) Generate URL
OAuth Endpoints in Salesforce
Authorization: https://login.salesforce.com/services/oauth2/authorize
Token Request: https://login.salesforce.com/services/oauth2/token
There are two way to get Access token
1) By Post Callout (Direct URL)
2) By OAuth Setting in POSTMAN (Wizard one)
3.2.1:- By Post Callout (Direct URL)
Use below link to Generate the Token for accessing SFDC
https://na50.salesforce.com/services/oauth2/token?grant_type=password&client_id=***Consumer Key_Here***&client_secret=***Consumer Secret_Here***&username=*********&password=*****password+securityToken******

NOTE:- May be After try to login you will get below error "Failed: Not approved for access"

Please check below post to resolve this issue
1) https://help.salesforce.com/articleView?id=000212208&language=en_US&type=1
2) http://amitsalesforce.blogspot.com/2017/06/failed-not-approved-for-access-in.html
Finally We have Access Token
3.2.2:- By OAuth Setting in POSTMAN (Wizard one)
- Select Type OAuth 2.0

- Then click on "Get Access Token". Then provide all below detail.

- Then click on Request Token button. Then it will ask you to enter userName and password.

- Here we have Access Token

Step 4) Test APEX REST API.
Now Copy the Access Token from above Screen. Add below detail to make get call
a. End point URL: https://na50.salesforce.com/services/apexrest/api/Account/12345
b. Select method as ‘GET’
c. Put the details in header as below:
Authorization: OAuth + Access Token

Or you can try like below as well.
Now Copy the Access Token from above Screen. Add below detail to make get call
a. Click Add Token to "Header"
b. Then select "Use Token"
c. Then select Get Method and add below URL
https://na50.salesforce.com/services/apexrest/api/Account/12345