Tuesday, July 17, 2018

Salesforce Lightning Events Part 5 - Application Events Introduction


Hello and welcome to the 5th tutorial of Salesforce Lightning Events Tutorial Series. As you are already aware of the component events, their types and how they propagate in salesforce. It's time to move on to the application events in Salesforce Lightning.

In simple terms, Application Events are just like broadcast messages. As when you have to send a broadcast message, you broadcast your message from a single device and all the other devices that have the receiver turned on for that message can receive that. Similarly, an application event is fired from one component and all the other components that have the handler defined for that event are notified and they can handle that application event. The component that fires the application event is called Source Component. Lightning Framework supports 3 phases for the propagation of application events:-
  1. Bubble Phase
  2. Capture Phase
  3. Default Phase
Now we'll be discussing these phases one by one:-

Bubble Phase

The flow of event in this phase is much similar to what we have done in the component event. In this phase, the component that fired the event can handle it. The event in bubble phase traverse from the source component to the application root. While the event is traversing towards the application root, any component in the containment hierarchy can handle this event. If any handler stops this event from propagating using event.stopPropagation(), then no more handlers will be called in this phase.

Capture Phase

In this phase, the event handlers are invoked from the application root towards the source component that fired the event. Any registered handler in the component hierarchy can stop the event from propagating by using event.stopPropagation() after that no more handlers will be able to handle the event in this phase or the bubble phase. If you have gone through the previous tutorials, you shoule be aware that the capture phase handlers always run before the bubble phase.

Default Phase

In this phase, the event handlers are invoked from the root to the source component which fired the event. If the event's  propagation wasn't stopped in the previous phase, the root corresponds to the application root. Otherwise, the root corresponds to the component who stopped the event from propagating further using event.stopPropagation(). This phase will execute only when event.preventDefault() was not called previously in capture or bubble phases.

Points to be noted:- 
  1. Any handler in the Bubble or Capture phase can cancel the default behavior of the event by calling event.preventDefault() i.e. if this method is invoked previously, the handlers in the default phase will not handle the event.
  2. If the event's propagation wasn't stopped in the previous phase, the root node for the default phase corresponds to the application root. Otherwise, the root node corresponds to the component in which the handler called event.stopPropagation() to stop the propagation of event.

Salesforce Lightning Events Part 4 - Understanding Container Components


Till now we have learned about component events, bubble and capture phase in component events. Now before moving to the application events, there is one more important concept regarding events which we need to learn and that is Container Components.

What is Container Component ?

Container Components are the components that are not the direct owner/parent of any other component but contain another component between their tags wherever they are defined. For ex:- If I make two lightning components named:- one.cmp and two.cmp and instead of calling two.cmp inside one.cmp I do something like this:-
<c:one.cmp>
                      <c:two.cmp />
</c:one.cmp>
So, in the above case, one.cmp is my container component as it is containing two.cmp within it's  opening and closing tags and is not the parent or direct owner of two.cmp.

While learning about component events bubble and capture phase I have told about hierarchy or containment hierarchy. So, let's see what a container component is and how this hierarchy is implemented. I'll be using the previous code implemented till now so if you just joined or want access to the current implementation you can read my previous blogs in the series listed here. Or at least have a look at the bubble phase implementation here.

So, we have 2 components already implemented:- LightningEventsCompContainer and LightningEventsComp1. Now, I am going to add one more component i.e. LightningEventsCompWrapper. This component is basically a container component which will be wrapping our base component i.e. LightningEventsComp1 and will be a direct child of LightningEventsCompContainer. Let's jump on to the code now for a deeper understanding:-

LightningEventsCompContainer.cmp

We have already used this component as it is the parent of our source component and is also responsible for handling the event fired by the source component. However, I have made a simple change in this component which you can see below:- 

<!-- Wrapper/Parent component called directly from the Lightning Application -->
<aura:component>
        <!-- Attribute to store total income coming through the event -->
        <aura:attribute name="totalIncome" type="decimal" default="0" ></aura:attribute>
        <!-- Handler defined to handle 'totalIncomeComponentEvent' name same as used in registerEvent tag -->
        <aura:handler name="totalIncomeComponentEvent" event="c:LightningComponentEvent"  action="{!c.handleTotalIncomeComponentEvent}"></aura:handler>
        Outer Component
        <!-- Inner component section with border -->
        <div class="innerComponent">
                Inner Component Section Begin
                <!-- Calling the inner component container -->
                <c:LightningEventsCompWrapper>
                        <!-- Calling the source component -->
                        <c:LightningEventsComp1 />
                </c:LightningEventsCompWrapper>
                Inner Component Section End
        </div>
        <!-- Section to show total income -->
        <span class="totalIncome">Total Income = {!v.totalIncome}</span>
</aura:component>
As you can see, I have wrapped the LightningEventsComp1 component in another lightning component named LightningEventsCompWrapper i.e. the tags of the wrapper component are now surrounding my source component. In terms of Salesforce, this component which is surrounding the source component in it's tags is called Container Component but in this tutorial, we'll call it as wrapper component for simplicity and as we have already made a component named LightningEventsCompContainer which is containing everything and is the parent component. So, let's move to this wrapper component now and see what we have in it.

LightningEventsCompWrapper.cmp

Below is the code for our new container component for innermost component which is firing the event. As it is wrapping my source component, I have named it as wrapper but in Salesforce docs, such a component is called as container component as it is containing another component within it's tags and is not the direct owner:- 

<!-- Container to wrap inner component -->
<aura:component>
        <!-- Event handler in wrapper component -->
        <aura:handler name="totalIncomeComponentEvent" event="c:LightningComponentEvent"  action="{!c.handleTotalIncomeComponentEvent}" includeFacets="true"></aura:handler>
        <!-- Wrapper Component -->
        <div class="wrapperComponent">
                Wrapper Component Section Begin
                <!-- Calling the body i.e. the data between the tags of wrapper/container component -->
                {!v.body}
                Wrapper Component Section End
        </div>
</aura:component>
As you can see above, in this component, I have defined a handler which is the same as we have defined in our parent component i.e. LightningEventsCompContainer. This handler is simply responsible for handling the event fired by our source component and is calling the controller function named:- handleTotalIncomeComponentEvent. Below this handler we have defined a div with class wrapperComponent which is responsible for giving a red border to this wrapper component and in the body of the div, I have called {!v.body} which is mainly responsible to get all the data between the tags of this component to this location inside our component as you can see, we have <c:LightningEventsComp1 /> inside the tags <c:LightningEventsCompWrapper> and </c:LightningEventsCompWrapper> in LightningEventsCompContainer.cmp above. So, here {!v.body} will be replaced by <c:LightningEventsComp1 /> and our source component will be inside the Inner Component section Begin and End lines as it takes the position of v.body.

There is one more thing to notice i.e. I have included an extra attribute named includeFacets="true" in the component event handler defined in wrapper component. This is because generally our wrapper component is only containing the source component in it's tags and therefore it'll not be able to handle the event fired by our source component, as it is not the direct owner/parent. So, to make it able to handle the events, we have to include includeFacets="true" attribute in the handler defined in our wrapper component.

LightningEventsCompWrapperController.js

({
        // Function invoked when event is handled
        handleTotalIncomeComponentEvent : function(component, event, helper) {
                alert('Event handler at the wrapper component');
        }
})

As you can see in the above code, I have simply defined a function named handleTotalIncomeComponentEvent which will be called when my event is handled by the wrapper component and it is simply giving an alert with message:- Event handler at the wrapper component so that, we know that the handler at the wrapper component is handling the event.

LightningEventsCompWrapper.css

Below is the css file that is defining the wrapperComponent class used in div to give a red border to our wrapper component in order to differentiate it with other components in the hierarchy.

.THIS {
}
/* Border of wrapper component */
.THIS.wrapperComponent {
        border: 1px solid red;
}
So, we have given the border to our wrapper component using border: 1px solid red; in the wrapperComponent class which is used  by our div.

I have configured all the handlers to work in bubble phase i.e. without having phase="capture" attribute in them and when you run this in your browser and click on Calculate Total Income button, you get the following outputs:-

Event handler at the source component is fired

Event handler at the wrapper component is fired

Event handler at the parent component is fired

Create a Lightning Component to view a record in 5 minutes (lightning:recordViewForm)


Recently, Salesforce has launched a number of new tags to make your task of building custom lightning components more easier. This is the first post in the Salesforce Lightning Tags Tutorial Series. In this post, I am going to talk about one of those tag which is :- <lightning:recordViewForm />. So, in the next 5 minutes we are going to learn about this tag and make our lightning component to view a specific record. Excited ? Let's get started..!!

I am going to make a lightning app and a single lightning component which will be called by that application so that you can see the preview directly without embedding that component in any page. So the time starts now..!!

LightningRecordViewApp.app - Lightning Application

<!-- 
        Lightning Application to call LightningRecordViewCmp.
        This app is extending force:slds to implement styling for using lightning design system classes
-->
<aura:application extends="force:slds">
        <!-- Calling LightningRecordViewCmp and passing a record Id -->
    <c:LightningRecordViewCmp recordId="0037F00000666yOQAQ" />
</aura:application>
As you can see in the above code, I have made a simple lightning application in which I have extended force:slds so that we can use slds in our application as well as in all the lightning components that are included in this application. This application is calling LightningRecordViewCmp by passing a recordId of a contact record as I am going to display a contact record in my lightning component. So, let's jump on to the component now.

LightningRecordViewCmp.cmp - Lightning Component

<!-- Lightning Component to display a record -->
<aura:component implements="force:appHostable,flexipage:availableForAllPageTypes,flexipage:availableForRecordHome,force:hasRecordId" access="global" >
    <!-- 
        Using lightning:recordViewForm tag record Id and objectApiName is required to fetch record.
        For custom objects, do check you have __c in the api name
     -->
        <lightning:recordViewForm recordId="{!v.recordId}" objectApiName="Contact">
        <!-- Using lightning:card tag with a title -->
        <lightning:card title="Contact Details">
            <!-- lightning:card body section starts -->
            <p class="slds-p-horizontal_small">
                <!-- Forming a grid of two equal columns -->
                <div class="slds-grid">
                    <div class="slds-col slds-size_1-of-2">
                        <!-- 
                            Using lightning:outputField Tag with fieldName = Api name of field,
                            if you are using a custom field, do check you have __c in the api name
                         -->
                        <lightning:outputField fieldName="FirstName" />    
                        <lightning:outputField fieldName="LastName" />    
                        <lightning:outputField fieldName="MobilePhone" />    
                    </div>
                    <div class="slds-col slds-size_1-of-2">
                        <lightning:outputField fieldName="AccountId" />    
                        <lightning:outputField fieldName="Department" />    
                        <lightning:outputField fieldName="Birthdate" />    
                    </div>
                </div>
            </p>
        </lightning:card>        
    </lightning:recordViewForm>
</aura:component>
In the above code, you can see that I have made a lightning component which is implementing force:hasRecordId along with the other implementations used to include lightning component in page, tabs and other locations. The force:hasRecordId tag adds a hidden attribute to our lightning component which we can access by its name i.e. recordId. Now, I have used lightning:recordViewForm tag. This tag mainly require 2 attributes i.e. the recordId of the record we have to fetch and the objectApiName i.e. the api name of object whose record we are getting. I have given the record Id of a contact by accessing the record Id we have passed through application and used Contact as the objectApiName as it is a standard object, in case of custom object, you can use it's api name that will include __c in the end. In the body of this tag I have made a simple lightning card with title Contact Details and in the card body, I have used simple slds classes to divide the body into two equal halves.

I have used lightning:outputField to display the fields of the contact record. It is another lightning tag given by salesforce which looks for the recordId in the parent lightning:recordViewForm and fetch the correct value based on the fieldName you have given for that particular record. The fieldName should be the api name of the field. In case of custom field, you'll be having __c at the end so make sure to use the exact api name. In my case, I have accessed the contact fields by giving their api names.

If you look at the second half, I have used AccountId which is the api name of account lookup on contact object. You'll see the account name in the app preview but when you embed this component in any contact detail page, you'll see the link to account instead of just name. So, this tag supports lookup field as well. Amazing..!!

Now, when you run your app, you'll see a lightning component like this:-

Salesforce Lightning Events Part 3 - Bubble and Capture Phase


This blog is in continuation to my previous blog post, so if you haven't read the previous blog at least have a look at the code here as I am not going to embed all the code snippets again in this blog.

As we already know about what component events are and we have also made a small application using component events in previous post. It's time to modify that application a little and learn more about types of phases in component events. You must have read earlier about Bubble and Capture phase in component events in my blog post Salesforce Lightning Events Part 1 - Component Events Introduction. We are going to see these phases in action here.

So, If you remember the code used in my previous blog, I have made a simple component event which will run by default in bubble phase to calculate the total income from the entries present in lightning datatable and pass that total income to the parent component from the source component using an event by clicking on Calculate Total Income Button. When you click on this button, you see the output like this:-

Output 1 - Alert message from source component that fired the event

This simply means that, as the lightning event traverse in bubble phase by default, therefore the handler of source component that fired the event is executed first and so we get the alert message - Event handler at source component that fired the event. Moving on to the second output which looks like below:-

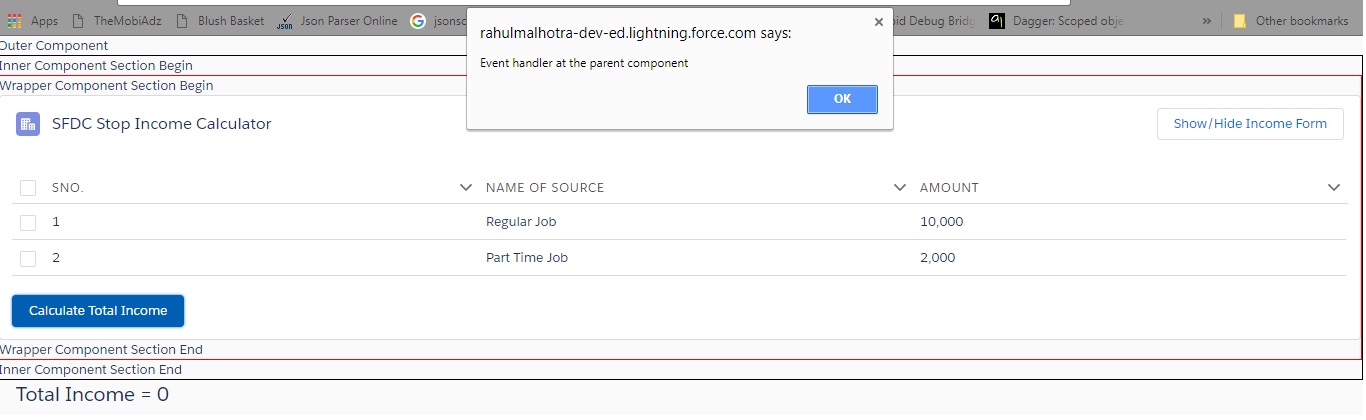
Output 2 - Alert message from parent component

This is the event handler defined at the parent component which is executed when the handler at the source component is already executed. As in the bubble phase, the handler at the source component is executed first and then the event is traversed up in the hierarchy and the handler at the parent component is executed.

({
        // Function to handle Lightning Event
        handleTotalIncomeComponentEvent : function(component, event, helper) {
                alert('Event handler at the parent component');
                // Getting the value of totalIncome attribute of event using event.getParam()
                var totalIncome = event.getParam('totalIncome');
                // Setting the totalIncome attribute of component with the event's totalIncome attribute value.
                component.set('v.totalIncome', totalIncome);
        }
})
If you remember, the handler defined at parent component as shown above, after the alert message, we set the value of totalIncome argument. So, we have a final output like this:-

Output 3 - Final change in the totalIncome variable by the parent component handler

Understanding Bubble Phase in Component Event

Now, let's make a small change in event handler in our source component i.e. in file LightningEventsComp1Controller.js, right now you have the following code:-

// Function to handle Lightning Event fired from this component itself.
handleRegisteredComponentEvent: function(component, event, helper) {
alert('Event handler at source component that fired the event.');
},
I am going to add one more line in this code and that is event.stopPropagation(); So, my final code is like given below:-

// Function to handle Lightning Event fired from this component itself.
handleRegisteredComponentEvent: function(component, event, helper) {
alert('Event handler at source component that fired the event.');
event.stopPropagation();
},
Now when  you run this app, you'll see that only output 1 is there and output 2 and 3 didn't came. So, what's the reason behind that ? You guessed it right..!! By default the event is propagating in Bubble Phase therefore, when we added event.stopPropagation(); in the handler defined in source component, the event stopped propagating and it didn't reached the parent component and so we didn't got output 2 and 3. We got only Output 1 in this case.

Okay, so we got the fact that how the events propagate in the bubble phase. Now it's time to move on to the capture phase. Remove the event.stopPropagation(); line so that we are back in the previous state where we were getting all the outputs 1, 2 and 3.

Understanding Capture Phase in Component Event

In our code, firstly move to LightningEventsComp1.cmp file and checkout the handler for event. You'll see something like this:-
<aura:handler name="totalIncomeComponentEvent" event="c:LightningComponentEvent" action="{!c.handleRegisteredComponentEvent}"></aura:handler>

Now, in the above code, I am going to add one extra attribute in the handler i.e. the final code is like given below:-

<aura:handler name="totalIncomeComponentEvent" event="c:LightningComponentEvent" action="{!c.handleRegisteredComponentEvent}" phase="capture"></aura:handler>
Notice that, I have added another attribute as phase="capture" in the event handler specifying that this event handler will now handle the capture phase of the fired event. Similarly, make this change in the handler present in LightningEventsCompContainer.cmp file. The initial and final versions of the second file are given below:-

Initial Version

<aura:handler name="totalIncomeComponentEvent" event="c:LightningComponentEvent" action="{!c.handleTotalIncomeComponentEvent}"></aura:handler>

Final Version

<aura:handler name="totalIncomeComponentEvent" event="c:LightningComponentEvent" action="{!c.handleTotalIncomeComponentEvent}" phase="capture"></aura:handler>
Now, as you can see in the final version of both the files, the handlers have added the attribute phase="capture". Now let's click on Calculate Total Income button again and check the changes in outputs. You'll see that the order of the output is Output 2 -> Output 1 -> Output 3. Now, we know that in capture phase the event start propagating from the application root. Therefore, the Output 2 i.e. alert in parent component appear before the alert in source component.

Notice that even the source component is firing the event and it has a handler defined to handle that event still the handler of parent component handles the event first because as the event is fired, it directly go to the application root without the handler being executed at the source component (if any) and then traverse down to the source component that fired the event.

There is a matter of surprise that the Output3 i.e. the updating the total income value should have occurred after output 2 and then output 1 should occur. Yes, you are right and this is only how it's happening but the point is that as the js updated the value of total income it didn't stop executing and the next alert message came up before the effect of change in totalIncome is reflected. The parent component handler is executed before the source component.

To make sure this concept you can add event.stopPropagation(); to the parent component handler function as given below:-

LightningEventsCompContainerController.js - Before adding stop propagation method

({
// Function to handle Lightning Event
handleTotalIncomeComponentEvent : function(component, event, helper) {
alert('Event handler at the parent component');
// Getting the value of totalIncome attribute of event using event.getParam()
var totalIncome = event.getParam('totalIncome');
// Setting the totalIncome attribute of component with the event's totalIncome attribute value.
component.set('v.totalIncome', totalIncome);
}
})
LightningEventsCompContainerController.js - After adding stop propagation method

({
// Function to handle Lightning Event
handleTotalIncomeComponentEvent : function(component, event, helper) {
alert('Event handler at the parent component');
// Getting the value of totalIncome attribute of event using event.getParam()
var totalIncome = event.getParam('totalIncome');
// Setting the totalIncome attribute of component with the event's totalIncome attribute value.
component.set('v.totalIncome', totalIncome);
event.stopPropagation();
}
})

You'll see that the child component handler is not executed as the event stopped propagating after reaching the parent component.So, the order of the output is as follows:- Output 2 -> Output 3.

So, we have seen the bubble phase as well as the capture phase and also the path the event follow in both the phases. But wait, these phases are only associated with event handler right..!!

What will happen when I configure one handler to handle bubble phase and other to handle capture phase ?? Let's figure it out.

Remove the event.stopPropagation(); so that we can continue again from the initial stateAs the event run in both the phases, you'll see no change as both the handlers will run when you run one handler in bubble and other in capture phase. But, notice that the handler which is in capture phase run first and the handler which is in bubble phase run after that.

Suppose you only add phase="capture" to LightningEventsComp1.cmp and the LightningEventsCompContainer.cmp runs in bubble phase as default. Given below is the handler in both the files:-

LightningEventsComp1.cmp

<aura:handler name="totalIncomeComponentEvent" event="c:LightningComponentEvent" action="{!c.handleRegisteredComponentEvent}" phase="capture"></aura:handler>

LightningEventsCompContainer.cmp

<aura:handler name="totalIncomeComponentEvent" event="c:LightningComponentEvent" action="{!c.handleTotalIncomeComponentEvent}"></aura:handler>
Now, you'll see that the order of output is as follows:- Output 1-> Output 2-> Output 3. So, the source component handler runs in capture phase and is executed first whereas the parent component runs in bubble phase and is executed after that. Before discussing why this happened let's make one more change which is just reverse of this. Let's add phase="capture" to LightningEventsCompContainer.cmp this time and not to LightningEventsComp1.cmp as shown below:-

LightningEventsComp1.cmp

<aura:handler name="totalIncomeComponentEvent" event="c:LightningComponentEvent" action="{!c.handleRegisteredComponentEvent}"></aura:handler>

LightningEventsCompContainer.cmp

<aura:handler name="totalIncomeComponentEvent" event="c:LightningComponentEvent" action="{!c.handleTotalIncomeComponentEvent}" phase="capture"></aura:handler>
Now, when you run the app again, you'll see that the order of output is as follows:- Output 2-> Output 1-> Output 3. Make sure that you don't get confused by Output 3 as it's the js delay in changing the value due to which other alert is executed as explained by me earlier. Just focus on Output 1 and Output 2. So, we got to know that this time the handler in LightningEventsCompContainer.cmp was in capture phase and executed first whereas handler in LightningEventsComp1.cmp was in bubble phase and executed later.

So, from this, we can conclude that,

"If handlers of same event are in different phases, then the handlers in capture phase are executed first following their order where as the handlers in bubble phase are executed in their order after the handlers in capture phase have done their execution".

In other words we can say that the capture phase is always handled before the bubble phase. But as we see, both the handlers are executed both the time. So, to have a better understanding, let's consider the previous code in which we have LightningEventsCompContainer in capture phase and LightningEventsComp1 in bubble phase. We are only going to do a single change now i.e. we are going to add event.stopPropagation(); to our handler action which is running in capture phase. So, below is the LightningEventsCompContainerController.js :-

({
// Function to handle Lightning Event
handleTotalIncomeComponentEvent : function(component, event, helper) {
alert('Event handler at the parent component');
// Getting the value of totalIncome attribute of event using event.getParam()
var totalIncome = event.getParam('totalIncome');
// Setting the totalIncome attribute of component with the event's totalIncome attribute value.
component.set('v.totalIncome', totalIncome);
event.stopPropagation();
}
})
As you can see above, we have added event.stopPropagation(); at the last line. Therefore, when you run the app now, you'll get the output in the following order:- Output 2 -> Output 3. Notice that Output 1 is not there. This is because, the capture phase stopped the event propagation and the event is not propagated in any phase after that. But what if we stop propagating the event in bubble phase ?? If you do so, you'll see that all the handlers that run in capture phase are executed successfully whereas only those handlers in the bubble phase are executed which come before the handler that stop the propagation of the event. I'll leave this to you as an exercise.

As a result, we can say that when an event propagation is stopped in bubble phase, it will not propagate further only in bubble phase as it has already propagated in capture phase before. Whereas, when an event propagation is stopped in capture phase, it'll not propagate further in any phase as the bubble phase as it has already stopped propagating in capture phase and the bubble phase executes after that.