Thursday, June 28, 2018

Salesforce Extentions:
1)Salesforce Organizer
2)Salesforce advanced code searcher
3)Salesforce Api fieldnames
4)Salesforce apexclass liks
5)Salesforce Devtools
6)Salesforce DataExporter
7)Salesforce console data exporter
8)Viwizard
9)CRM Sceience - admin Assist
10)SOQL extractor and analyzer for salesforce
11)Record and Metadata Comparator for Salesforce
12)Salesforce.com Sandbox Favicon Extension
13)Salesforce inspector
14)Salesforce Admin Check All
15)Salesforce Navigator
16)Force.com Logins 
GITHUB Access
https://github.com/sfdc3154/venkat9916

Tuesday, June 26, 2018

Lightning Component record ID when component in Lightning Page:

Interfaces:

force:hasRecordId,
force:appHostable,
force:lightningQuickAction,
force:lightningQuickActionWithoutHeader
forceCommunity:availableForAllPageTypes,
flexipage:availableForAllPageTypes,
flexipage:availableForRecordHome,
clients:availableForMailAppAppPage,
clients:hasEventContext,
clients:hasItemContext,
ltng:allowGuestAccess

You need to implement the interface:
force:hasRecordId
in your component and then you can access the record id via the following expression
{!v.recordId}
An example component would be:
<aura:component controller="CTRL_F_Controller" implements="flexipage:availableForAllPageTypes,force:hasRecordId">
<aura:attribute name="Account" type="Account"/>
    <ltng:require styles="/resource/bootstrap"/>
    <div class="bootstrap-sf1">
       <div class="container">
           <ui:outputText class="form-control" aura:id="recid" value="{!v.recordId}" />
        </div>
    </div>
</aura:component>

Some of these interfaces are summarized below. For a complete list, refer to the Component Library.
<aura:component controller="CreateCandidateRecord" 
    implements="force:hasRecordId,
force:appHostable,
force:lightningQuickAction,
force:lightningQuickActionWithoutHeader
forceCommunity:availableForAllPageTypes,
flexipage:availableForAllPageTypes,
flexipage:availableForRecordHome,
clients:availableForMailAppAppPage,
clients:hasEventContext,
clients:hasItemContext,
ltng:allowGuestAccess"> 
clients:availableForMailAppAppPage
To appear in the Lightning App Builder or a Lightning Page in Lightning for Outlook or Lightning for Gmail, a component must implement the clients:availableForMailAppAppPage interface. For more information, see Create Components for Lightning for Outlook and Lightning for Gmail.
clients:hasEventContext
Enables a component to be assigned to an event’s date or location attributes in Lightning for Outlook and Lightning for Gmail. For more information, see Create Components for Lightning for Outlook and Lightning for Gmail.
clients:hasItemContext
Enables a component to be assigned to an email’s or a calendar event’s item attributes in Lightning for Outlook and Lightning for Gmail. For more information, see Create Components for Lightning for Outlook and Lightning for Gmail.
flexipage:availableForAllPageTypes
A global interface that makes a component available in the Lightning App Builder, and for any type of Lightning page. For more information, see Configure Components for Lightning Pages and the Lightning App Builder.
To appear in the utility bar, a component must implement the flexipage:availableForAllPageTypes interface. For more information, see Add a Utility Bar to Lightning Appsin Salesforce Help.
flexipage:availableForRecordHome
If your component is designed only for record pages, implement the flexipage:availableForRecordHome interface instead of flexipage:availableForAllPageTypes. For more information, see Configure Components for Lightning Experience Record Pages.
forceCommunity:availableForAllPageTypes
To appear in Community Builder, a component must implement the forceCommunity:availableForAllPageTypes interface. For more information, see Configure Components for Communities.
force:appHostable
Allows a component to be used as a custom tab in Lightning Experience or the Salesforce app. For more information, see Add Lightning Components as Custom Tabs in a Lightning Experience App.
force:lightningQuickAction
Allows a component to display in a panel with standard action controls, such as a Cancel button. These components can also display and implement their own controls, but should handle events from the standard controls. If you implement force:lightningQuickAction, you can’t implement force:lightningQuickActionWithoutHeader within the same component. For more information, see Configure Components for Custom Actions.
force:lightningQuickActionWithoutHeader
Allows a component to display in a panel without additional controls. The component should provide a complete user interface for the action. If you implement force:lightningQuickActionWithoutHeader, you can’t implement force:lightningQuickAction within the same component. For more information, see Configure Components for Custom Actions.
ltng:allowGuestAccess
Add the ltng:allowGuestAccess interface to your Lightning Out dependency app to make it available to users without requiring them to authenticate with Salesforce. This interface lets you build your app with Lightning components, and deploy it anywhere and to anyone. For more information, see Share Lightning Out Apps with Non-Authenticated Users.

Thursday, June 14, 2018

Salesforce Connect

Salesforce Connect provides seamless integration of data across system boundaries by letting your users view, search, and modify data that’s stored outside your Salesforce org. For example, perhaps you have data that’s stored on premises in an enterprise resource planning (ERP) system. Instead of copying the data into your org, you can use external objects to access the data in real time via web service callouts.
Available in: both Salesforce Classic and Lightning Experience
Available in: Developer Edition
Available for an extra cost in: EnterprisePerformance, and Unlimited Editions
Traditionally, we’ve recommended importing or copying data into your Salesforce org to let your users access that data. For example, extract, transform, and load (ETL) tools can integrate third-party systems with Salesforce. However, doing so copies data into your org that you don’t need or that quickly becomes stale.
In contrast, Salesforce Connect maps Salesforce external objects to data tables in external systems. Instead of copying the data into your org, Salesforce Connect accesses the data on demand and in real time. The data is never stale, and we access only what you need. We recommend that you use Salesforce Connect when:
  • You have a large amount of data that you don’t want to copy into your Salesforce org.
  • You need small amounts of data at any one time.
  • You want real-time access to the latest data.
Even though the data is stored outside your org, Salesforce Connect provides seamless integration with the Lightning Platform. External objects are available to Salesforce tools, such as global search, lookup relationships, record feeds, and the Salesforce app. External objects are also available to Apex, SOSL, SOQL queries, Salesforce APIs, and deployment via the Metadata API, change sets, and packages.
For example, suppose that you store product order information in a back-office ERP system. You want to view those orders as a related list on each customer record in your Salesforce org. Salesforce Connect enables you to set up a lookup relationship between the customer object (parent) and the external object (child) for orders. Then you can set up the page layouts for the parent object to include a related list that displays child records.
Going a step further, you can update the orders directly from the related list on the customer record. By default, external object records are read only. But you can define the external data source to enable writable external objects.
For information about using Apex DML write operations on external object records, see theLightning Platform Apex Code Developer's Guide.

Example

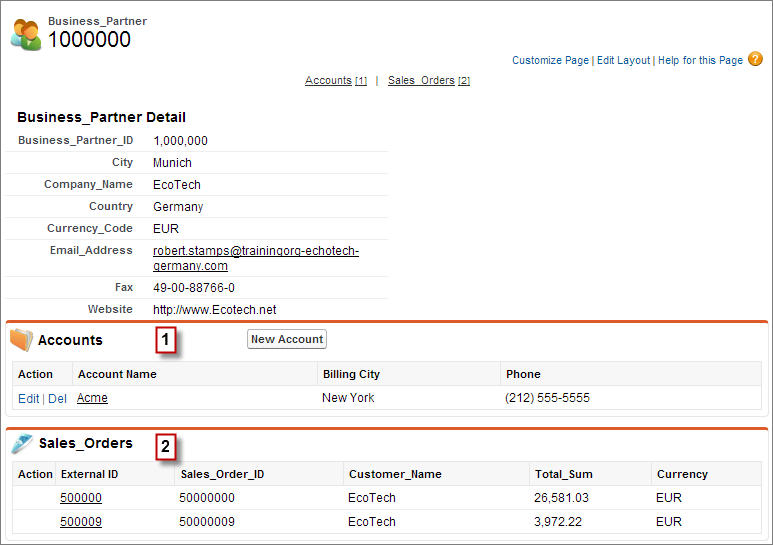
This screenshot shows how Salesforce Connect can provide a seamless view of data across system boundaries. A record detail page for the Business_Partner external object includes two related lists of child objects. The external lookup relationships and page layouts enable users to view related data from inside and from outside the Salesforce org on a single page.
  • Account standard object (1)
  • Sales_Order external object (2)
External object record detail page with standard object Account related list and external object Sales_Order related list

External Objects:


Add an External Data Source

When you create an external data source, you can connect to another Salesforce org or a third-party database or content system. After you create the external data source, you can create an external object and add the external data source to the permission set.
Available in: both Salesforce Classic and Lightning Experience
User Permissions Needed
To create an external data source:Customize Application
To create an external object:Customize Application
To add the external data source to the permission set:Customize Application
  1. From Setup, enter External Data Sources in the Quick Find box, and select External Data Sources.
  2. Click New External Data Source.
  3. Complete the following fields, and click Save:
    1. Under External Data Source, enter a label and press Tab.
    2. Under Type, select Files Connect: Quip.
    3. Under Identity Type, select Per User or Named Principal, depending on your org or admin requirement.
    4. Under Authentication Protocol, select OAuth 2.0.
    5. Under Authentication Provider, click the Search icon and choose the Auth provider that you created earlier.
    6. Select Start Authentication Flow on Save.
    Image of the New External Data Source page in Setup
  4. On the permissions page that appears, click Allow to give the Connector offline access.
    The Administration Authentication Status on the External Data Source page changes from Pending to Authenticated.
  5. Create the external object.
    1. On the External Data Source page that you created, click Validate and Sync.
    1. Select the checkbox next to the item in the table, and click Sync.
  6. Add the external data source to the permission set.
    1. From Setup, enter Permission Sets in the Quick Find box, and select Permission Sets.
    2. Click the permission set that you created, click External Data Source Access, and click edit.
    3. Select the external data source from the Available External Data Sources field, add it to the Enabled External Data Sources field, and click Save.