What Is A Lifecycle Hook?
A lifecycle hook is a callback method which is called automatically at some point during a lightning web component's lifecycle. In simple words, I can say: From the moment a component is initialized, till the moment it's removed from the page, there are various important instances that can be used by developers to perform various actions. So, in order to allow the developers to perform those actions, some callback methods are automatically called during these instances.
What Are The Different Lifecycle Hooks Of Lightning Web Components?
There are mainly 5 lifecycle hooks in lightning web components. They are:
- constructor()
- connectedCallback()
- renderedCallback()
- disconnectedCallback()
- errorCallback()
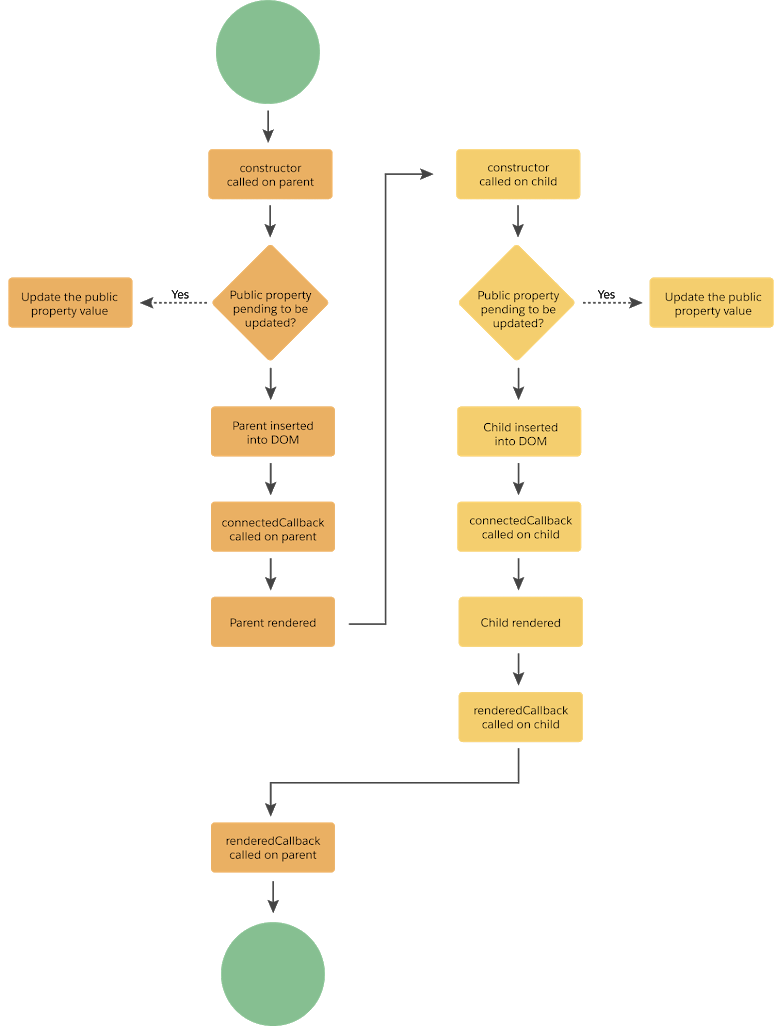
There is a great diagram present in the
salesforce official documentation showcasing the lifecycle flow or in other words: the order in which these lifecycle hooks are being called. Let's take a look at that below:
This basically means that whenever a parent and child component is rendered on the page, the order of lifecycle hooks will be as follows:
- constructor() called on parent
- connectedCallback() called on parent
- constructor() called on child
- connectedCallback() called on child
- renderedCallback() called on child
- renderedCallback() called on parent
In case of an error in child component, the errorCallback() of parent component will be called after the first 4 callbacks mentioned above i.e. before calling the renderedCallback() for child + parent component. The updated order in case of an error in child will be:
- constructor() called on parent
- connectedCallback() called on parent
- constructor() called on child
- connectedCallback() called on child
- errorCallback() called on parent
- renderedCallback() called on child
- renderedCallback() called on parent
Now it's time to get into action and verify whatever we specified above
constructor()
This callback method is called as a component is constructed. The first statement inside a constructor should always be super(). Calling super() will provide the correct value for this keyword which we can use in our lwc. Some more important points about constructor are:
- You cannot access public properties (i.e. the properties annotated with @api) within a component's constructor. If you try to refer anything, it'll come as undefined
- You cannot access any html tag/element inside the component's constructor as the component is not rendered yet.
- You can access private properties of a component inside a constructor
Now the question is: What should we use constructor() for?
Like a normal javascript class, this lwc class constructor can also be used to initialize some private variables you may have. It can be used to perform an operation like: calling your apex method (or any javascript method) to retrieve information or perform a particular action.
Let's have a look at an example lightning component named Child below:
child.js
import { LightningElement, api } from 'lwc';

export default class Child extends LightningElement {

    count = 0;
    @api
    message = 'default';

    constructor() {
        super();
        console.log('Child constructor called');
        console.log(this.count);
        console.log(this.message);
        console.log(this.template.querySelector('lightning-button'));
    }
}
As you can see in the above js file, a constructor is defined. Inside the constructor, first of all calling super(), then we are displaying a text - Child constructor called, then displaying value of private variable count, after that we're displaying value of public variable message and finally we're trying to display the reference to a lightning-button element present in our html.
child.html
We have a lightning-button with label Increase Count in our html file which will call a js method increaseCount() as the button is clicked:
<template>
    <lightning-button label="Increase Count" onclick={increaseCount}></lightning-button>
    <br /><br />
</template>
We'll use this button later in the tutorial. For now, let's see the console logs as this component is rendered:
First we have the message
Child constructor called, the value of private variable
count is coming as
0 inside the constructor, the value of public variable
message is coming as
undefined and finally, the reference to
lightning-button is also coming as
null inside the constructor, because the component is not rendered yet.
connectedCallback()
This callback method is called when a lwc component is inserted into the dom. It establishes communication of the lwc component with the current document or container where it is inserted. Some important points about connected callback are:
- connectedCallback() on the parent component will be called before connectedCallback() on the child component is called. This is the reason that you cannot access child components from connectedCallback() of parent, as the child components are not inserted into the dom yet
- This callback is invoked after all the public properties are set. This means that whatever initial values are being passed to the public properties of component, the component will have those values assigned when the connectedCallback() is called
- This also means that connectedCallback() can only access the INITIAL VALUES OF PUBLIC PROPERTIES i.e. if you're updating the public property after the component is inserted, connectedCallback() will not be called again with the new value of public property. So, if you've a method which should be called based on the value of public property, it's better to call that method in a setter instead of connectedCallback() as the setter will be called again and again whenever the value of public property is set/updated
- You can perform some initialization tasks in the connectedCallback() like: listening for events or getting some initial data from the server
- connectedCallback() can be called more than 1 time as well. An example scenario can be: when a component is removed from the DOM and inserted again
Let's add connectedCallback() to our Child lwc component now. The updated code is provided below:
child.js
import { LightningElement, api } from 'lwc';

export default class Child extends LightningElement {

    count = 0;
    @api
    message = 'default';

    constructor() {
        super();
        console.log('Child constructor called');
        console.log(this.count);
        console.log(this.message);
        console.log(this.template.querySelector('lightning-button'));
    }

    connectedCallback() {
        console.log('Child connected callback called');
        console.log(this.count);
        console.log(this.message);
        console.log(this.template.querySelector('lightning-button'));
    }
}
As you can see above, I'm trying to access the private property
count, public property
message and
lightning-button again in my connectedCallback(), if you remember in our constructor, we were only able to access the value of private property i.e. count, message was coming as undefined and lightning-button reference was coming as null. Let's see if we're able to access anything else now out of these.
As you can see in the output above, message is coming as default this time instead of undefined. However, the reference to lightning-button is still coming as null. This is because the public properties of our lwc component are now having the initial value assigned to them. As lightning-button is a child component with respect to our child lwc component, it's still not connected to the DOM and therefore is coming as null (remember the first point specified above: connectedCallback() on the parent is called before connectedCallback() on the child and here child component is lightning-button).
Let's create a parent component as well and pass the value to our message (public property) from there to ensure it gets reflected in our connectedCallback() as well. Our parent component's name is Parent and the code for the same is provided below:
parent.html
<template>
    <c-child message="hello"></c-child>
</template>
As you can see above, we're passing the value of message variable as
hello. Let's take a look at the js file as well
parent.js
import { LightningElement } from 'lwc';

export default class Parent extends LightningElement {

    constructor() {
        super();
        console.log('Parent constructor called');
    }

    connectedCallback() {
        console.log('Parent connected callback called');
        console.log(this.template.querySelector('c-child'));
    }

    renderedCallback() {
        console.log('Parent rendered callback called');
        console.log(this.template.querySelector('c-child'));
    }
}
Here also, I've defined a constructor and a connectedCallback() as well to see in which order the parent child lifecycle hooks are being called. I also added a renderedCallback(). This renderedCallback() method should be called post connectedCallback() is called on child as per the order. We'll learn more about renderedCallback() in a bit, I've added this here for a reason. Let's have a look at the updated console.log() now:
The order of events is shown below:
- Parent constructor() is called
- Parent connectedCallback() is called and the reference to child component c-child is coming as null inside it
- Child constructor() is called. Value of count is 0, message is undefined and reference to lightning-button is coming as null as it's further a child component for our child lwc.
- Child connectedCallback() is called where value of count is 0. Notice that the value of message is hello instead of default this time because this is the value which is passed from our parent lwc to child lwc for this public property, reference to lightning-button is still coming as null
- Finally, our renderedCallback() method is called in our parent component as per the order and as it's called after the child's connectedCallback() method, this means that the child lwc is now connected to the DOM. Therefore, reference to child lwc is not coming as null this time, as it was coming in the parent's connectedCallback() method.
I hope all of this is clear. Now, let's move on to the renderedCallback() method.
renderedCallback()
As the name suggests, this callback method is called once the component has rendered. As the component can render multiple times, this callback method will also be called each time the component is re-rendered. Some important points about renderedCallback() are:
- renderedCallback() on the child component is called before it's called on the parent component
- Whenever the component renders, the expressions used in a template are re-evaluated. This means that if we've created a getter method which is used in our html file and that getter is returning a dynamic value based on some properties, it'll be re-evaluated as well
- Whenever the component's state is changed, the component will be re-rendered
- When a component is re-rendered, the lwc engine attempts to reuse the existing elements. For example: if you update something in the parent component due to which the parent re-renders, it'll not re-render the child component. Another example can be: if you're displaying a list of child components and if you re-order the list, then although the components are placed at different positions now, they're not re-rendered. The engine assumes that the same components are being used and just placed at a different positions now, so they're not re-rendered
However, if you use a different key/update the key of child component, it might get re-rendered - I'm not going to show a demo of this, this is your homework. Try and let me know how it works in the comments down below!
- As I specified in point 3, whenever the component's state is changed, the component will be re-rendered. Therefore, we need to make sure that we don't update the state of the component (for example: a property which is being displayed in component's html) in the renderedCallback() itself as it'll re-render the component and will call renderedCallback() again. In this case, the renderedCallback() will be called again and again recursively which will result in an infinite loop
We've already defined renderedCallback() in our parent component as specified in the connectedCallback() section. Let's define renderedCallback() in our child lwc as well.
child.js
import { LightningElement, api } from 'lwc';

export default class Child extends LightningElement {

    count = 0;
    @api
    message = 'default';

    constructor() {
        super();
        console.log('Child constructor called');
        console.log(this.count);
        console.log(this.message);
        console.log(this.template.querySelector('lightning-button'));
    }

    connectedCallback() {
        console.log('Child connected callback called');
        console.log(this.count);
        console.log(this.message);
        console.log(this.template.querySelector('lightning-button'));
    }

    renderedCallback() {
        console.log('Child rendered callback called');
        console.log(this.template.querySelector('lightning-button'));
    }
}
Let's have a look at the updated logs now:
The order of events is provided below:
- Parent constructor called
- Parent connected callback called where reference to child lwc is coming as null
- Child constructor called where count is 0, message is undefined and reference to lightning-button is coming as null
- Child connected callback called where count is 0, message is hello and reference to lightning-button is again coming as null
- Child rendered callback called where reference to lightning-button is coming properly as the lightning-button is connected to the DOM now
- At last, parent rendered callback is called where reference to child lwc is coming properly as the child lwc is connected to DOM now
We are now going to re-render the parent lwc to see when renderedcallback() is called in parent and child LWCs. Let's add some more code!
If you remember, our child lwc html is calling a method increaseCount() when the lightning-button is clicked, let's add that method to our child lwc js file as shown below:
increaseCount() {
    this.dispatchEvent(new CustomEvent('increasecount', {
        detail: {
            message: 'Increased count to ' + (++this.count)
        }
    }));
}
This method will fire an event named increasecount whenever the button is clicked which will contain a message with the value of count variable increased by 1. The full code of child.js is provided below:
child.js
import { LightningElement, api } from 'lwc';

export default class Child extends LightningElement {

    count = 0;
    @api
    message = 'default';

    constructor() {
        super();
        console.log('Child constructor called');
        console.log(this.count);
        console.log(this.message);
        console.log(this.template.querySelector('lightning-button'));
    }

    connectedCallback() {
        console.log('Child connected callback called');
        console.log(this.count);
        console.log(this.message);
        console.log(this.template.querySelector('lightning-button'));
    }

    renderedCallback() {
        console.log('Child rendered callback called');
        console.log(this.template.querySelector('lightning-button'));
    }

    increaseCount() {
        this.dispatchEvent(new CustomEvent('increasecount', {
            detail: {
                message: 'Increased count to ' + (++this.count)
            }
        }));
    }
}
Notice the increaseCount() added at the end. Let's update our parent.html file as well now:
parent.html
<template>
    <lightning-card title={message}>
        <p class="slds-var-p-around_small">
            <c-child onincreasecount={updateMessage} message="hello"></c-child>
        </p>
    </lightning-card>
</template>
As you can see above, I've covered my child lwc with a lightning card which is displaying the value of message variable as title. I'm also capturing the increasecount event and calling another method in my parent.js named updateMessage() which will update the value of message variable displayed in the card title. Finally, let's take a look at our updateMessage() defined in parent.js as well:
updateMessage(event) {
    this.message = event.detail.message;
}
As you can see above, it's updating the message variable with the value of message coming from the event. This message variable will be displayed as the title of lightning-card. Let's have a look at the full code below:
parent.js
import { LightningElement, track } from 'lwc';

export default class Parent extends LightningElement {

    message = 'Updated count will appear here!';

    constructor() {
        super();
        console.log('Parent constructor called');
    }

    connectedCallback() {
        console.log('Parent connected callback called');
        console.log(this.template.querySelector('c-child'));
    }

    renderedCallback() {
        console.log('Parent rendered callback called');
        console.log(this.template.querySelector('c-child'));
    }

    updateMessage(event) {
        this.message = event.detail.message;
    }
}
Notice the default value of message variable as: Updated count will appear here!. I've defined the updateMessage() method at the end which is updating the value of this message variable. Let's take a look at the component in action:
As we click the Increase Count button present in child lwc, it fires an event with updated value of count. This increasecount event is captured by parent lwc and it'll update the value of message variable shown as a title of lightning-card as shown above.
The thing to notice here is that, each time we click the button and the event is fired, it re-renders the parent component as shown below:
Notice that only the parent lwc's rendered callback is called again and again and not the child one as I increased count from 1 to 5. This means that even though the parent is rendered multiple times, the child LWC is just reused as there's no change in the state of child lwc. It's still showing the same Increase Count button. This covers our point 3 and 4 under important points about renderedCallback(). It's time to move on to the next callback method now i.e. disconnectedCallback()
disconnectedCallback()
disconnectedCallback() will be called whenever the component is disconnected from the DOM, it's mainly useful to clean up the work done in connectedCallback(). You can use it for simple purposes like to remove cache or event listeners. Let's define disconnectedCallback() on our child component js. You can simply add the below method:
disconnectedCallback() {
    console.log('Child disconnected callback called');
}
Our updated child.js file is shown below:
child.js
import { LightningElement, api } from 'lwc';

export default class Child extends LightningElement {

    count = 0;
    @api
    message = 'default';

    constructor() {
        super();
        console.log('Child constructor called');
        console.log(this.count);
        console.log(this.message);
        console.log(this.template.querySelector('lightning-button'));
    }

    connectedCallback() {
        console.log('Child connected callback called');
        console.log(this.count);
        console.log(this.message);
        console.log(this.template.querySelector('lightning-button'));
    }

    renderedCallback() {
        console.log('Child rendered callback called');
        console.log(this.template.querySelector('lightning-button'));
    }

    disconnectedCallback() {
        console.log('Child disconnected callback called');
    }

    increaseCount() {
        this.dispatchEvent(new CustomEvent('increasecount', {
            detail: {
                message: 'Increased count to ' + (++this.count)
            }
        }));
    }
}
Notice the disconnectedCallback() added above the increaseCount() and below renderedCallback(). Let's update our parent component a little bit as well to make sure we're able to disconnect child lwc from the DOM.
Updated parent.html file is provided below:
parent.html
<template>
    <lightning-card title={message}>
        <p class="slds-var-p-around_small">
            <template if:true={show}>
                <c-child onincreasecount={updateMessage} message="hello"></c-child>
            </template>
            <lightning-button label="Toggle Child" onclick={toggleChild}></lightning-button>
        </p>
    </lightning-card>
</template>
As you can see above, I've added a template tag with if:true condition which is checking a boolean variable named show. Only when this variable is true, our child component will be displayed to us. I'm going to create this variable in our parent.js file. I've added another lightning-button with label Toggle Child which is calling the toggleChild() when clicked. On click of this button, I'm going to toggle the value of show variable from true -> false or from false -> true which will hide/show the child lwc component. This will utlimately call our disconnectedCallback() on our child lwc as well. Let's take a look at the updated parent.js now:
parent.js
import { LightningElement, track } from 'lwc';

export default class Parent extends LightningElement {

    message = 'Updated count will appear here!';
    show = true;

    constructor() {
        super();
        console.log('Parent constructor called');
    }

    connectedCallback() {
        console.log('Parent connected callback called');
        console.log(this.template.querySelector('c-child'));
    }

    renderedCallback() {
        console.log('Parent rendered callback called');
        console.log(this.template.querySelector('c-child'));
    }

    updateMessage(event) {
        this.message = event.detail.message;
    }

    toggleChild() {
        this.show = !this.show;
    }
}
As you can see above, I've added show variable below message variable whose default value is true. I've also added another method named toggleChild() at the end. This method will be called when we click the Toggle Child lightning button and it'll toggle the value of show variable from true to false and from false to true.
This toggling will automatically hide/show the child lwc or I can say connect/disconnect child lwc from the DOM. Let's take a look at the component in action first:
As you can see in the above demo, first of all I increased the count using Increase Count lightning-button in the child component to 2. Then I clicked on Toggle Child button which removed the child component from the DOM. I brought it back by clicking the Toggle Child button again and then I clicked on Increase Count button again which increased the value of count starting from 1 to 5. It started from 1 again as the child lwc is reinitialized and therefore is having the default value of count as 0. Let's take a look at related logs now.
After the components were loaded initially and I clicked on Increase Count button twice and then the Toggle Child button which removed the child lwc from DOM. The console.log statements for these 3 operations are shown below:
As you can see, for the first two operations, when count is increased, parent renderedCallback() is called and I can refer the child lwc easily as it's connected to the DOM. Then I clicked Toggle Child button, it called child's disconnectedCallback() and we have the statement: Child disconnected callback called printed to the console. It also called parent's renderedCallback() as the child is removed from the DOM so the parent is also re-rendered. Notice that this time, the child lwc reference in the parent's renderedCallback() is coming as null as the child component is no more connected to the DOM.
Let's click the Toggle Child button again now:
As you can see above, as I clicked on Toggle Child button again, the child lwc is again connected to DOM. Therefore, the child constructor() is called again, then child connectedCallback() is called, then renderedCallback() and finally parent's renderedCallback() is called once again and this time the reference to child lwc is not coming as null.
Post that, I clicked on Increase Count button 5 more times, the count is increased from 1 to 5 and the parent lwc is rendered 5 times as shown below:
errorCallback()
Now, let's take a look at our last method in the lwc lifecycle i.e. errorCallback(). This callback method will be called whenever an error occurs in lifecycle hook and it captures errors in all the child (descendent) components in it's tree. Let's understand with an example. I'm going to throw error from the connectedCallback() of my child.js file. I'll also define errorCallback() methods in both child and parent lwc to understand which method is being called and the information received in the errorCallback() method. Let's update our child lwc first.
child.js
import { LightningElement, api } from 'lwc';

export default class Child extends LightningElement {

    count = 0;
    @api
    message = 'default';

    constructor() {
        super();
        console.log('Child constructor called');
        console.log(this.count);
        console.log(this.message);
        console.log(this.template.querySelector('lightning-button'));
    }

    connectedCallback() {
        console.log('Child connected callback called');
        console.log(this.count);
        console.log(this.message);
        console.log(this.template.querySelector('lightning-button'));
        let error = {
            code: 100,
            message: 'Error from child connected callback!'
        };
        throw error;
    }

    renderedCallback() {
        console.log('Child rendered callback called');
        console.log(this.template.querySelector('lightning-button'));
    }

    disconnectedCallback() {
        console.log('Child disconnected callback called');
    }

    errorCallback(error, stack) {
        console.log('Child error callback called, error = ' + JSON.stringify(error) + ', stack = ' + JSON.stringify(stack));
    }

    increaseCount() {
        this.dispatchEvent(new CustomEvent('increasecount', {
            detail: {
                message: 'Increased count to ' + (++this.count)
            }
        }));
    }
}
As you can see above, I've updated the connectedCallback(). I'm also showing this update again below:
connectedCallback() {
    console.log('Child connected callback called');
    console.log(this.count);
    console.log(this.message);
    console.log(this.template.querySelector('lightning-button'));
    let error = {
        code: 100,
        message: 'Error from child connected callback!'
    };
    throw error;
}
I've added 4 more lines after console.log statements where I'm defining an error object with two properties, code and message. Then I'm throwing that error object. I also defined errorCallback() method as shown in the below snippet:
errorCallback(error, stack) {
    console.log('Child error callback called, error = ' + JSON.stringify(error) + ', stack = ' + JSON.stringify(stack));
}
errorCallback() has two parameters:
- error: This is the JavaScript native error object. It's the error which was thrown by component where it occured. In our case it'll be the error object we're throwing which is having two properties: code and message.
- stack: This is a string specifying - in which component the error occured. It'll show path from the component whose errorCallback() was called till the child component where error was thrown
Let's add the errorCallback() in parent lwc as well. I'm going to add the below method to parent.js:
errorCallback(error, stack) {
    console.log('Parent error callback called, error = ' + JSON.stringify(error) + ', stack = ' + stack);
    console.log(this.template.querySelector('c-child'));
}
Let's take a look at the full parent.js file as well after updates:
parent.js
import { LightningElement, track } from 'lwc';

export default class Parent extends LightningElement {

    message = 'Updated count will appear here!';
    show = true;

    constructor() {
        super();
        console.log('Parent constructor called');
    }

    connectedCallback() {
        console.log('Parent connected callback called');
        console.log(this.template.querySelector('c-child'));
    }

    renderedCallback() {
        console.log('Parent rendered callback called');
        console.log(this.template.querySelector('c-child'));
    }

    errorCallback(error, stack) {
        console.log('Parent error callback called, error = ' + JSON.stringify(error) + ', stack = ' + stack);
        console.log(this.template.querySelector('c-child'));
    }

    updateMessage(event) {
        this.message = event.detail.message;
    }

    toggleChild() {
        this.show = !this.show;
    }
}
Notice the errorCallback() added below renderedCallback(). Now, let's take a look at the console statements as the components are loaded to understand how errorCallback() is being called:
A couple of things to notice above:
- Only the parent errorCallback() is called and not the errorCallback() present in the child lwc
- Error object is received in the errorCallback() which is exactly the same as thrown by the child lwc. The stack string received in the errorCallback() is showing the stack/path from the parent lwc (the component whose errorCallback() is called) to child lwc (where the error was thrown) as: <c-parent> <c-child>
- I am trying to display a reference to child lwc in the errorCallback() as well and it's working fine. This means that once the child lwc is connected to the DOM it can be referred in any of the callback methods be it errorCallback() or renderedCallback()
Let's take a look at the order in which the callback methods are executed as well:
- Parent: constructor() called
- Parent: connectedCallback() called (reference to child lwc is null)
- Child: constructor() called (count is coming as 0, message as undefined and reference to lightning-button is coming as null)
- Child: connectedCallback() called (count is coming as 0, message as hello and reference to lightning-button is still null as lightning-button is not connected to DOM yet). This callback method is also throwing error now
- Parent: errorCallback() called (child lwc can now be referenced as it's now connected to DOM)
- Child: renderedCallback() called (reference to lightning-button is coming properly now as lightning-button is now connected to DOM)
- Parent: renderedCallback() called (child lwc can now be referenced here as well because it's now connected to DOM)
So that's the final series of events/callbacks we have for this post in our demo components.
We covered all the callback methods/lifecycle hooks of lwc in this post.