Getting started with basics of Lightning Component
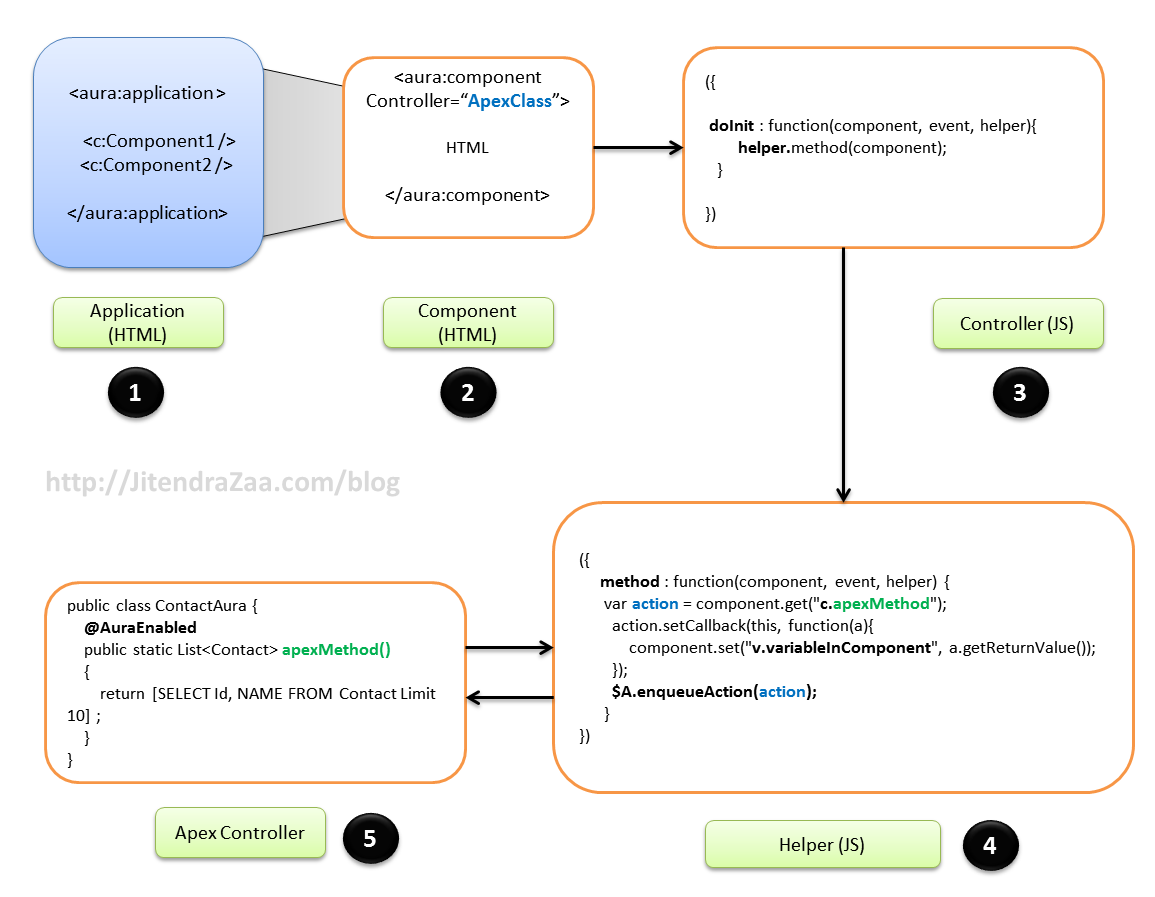
In below image, I have tried to explain at high level, how different JavaScript files are related in Lightning components, there are many other parts as well, but I tried to keep it short and simple.
Getting started with lightning components
Component Bundles
Lightning components consists of many resources as explained in below table.
Resource
Resource Name
Usage
Component or Application
sample.cmp or sample.app
The only required resource in a bundle. Contains markup for the component or app. Each bundle contains only one component or app resource.
CSS Styles
sample.css
Styles for the component.
Controller
sampleController.js
Client-side controller methods to handle events in the component.
Design
sample.design
Required for components used in the Lightning App Builder or Lightning Pages.
Helper
sampleHelper.js
JavaScript functions that can be called from any JavaScript code in a component’s bundle.
Documentation
sample.auradoc
A description, sample code, and one or multiple references to example components.
Renderer
sampleRenderer.js
Client-side renderer to override default rendering for a component.
SVG
sample.svg
Custom icon resource for components used in the Lightning App Builder.
Lightning Application
Lightning applications are standalone page, which contains many other lightning components. Its mark up is similar to HTML as shown in above image. To create Lightning application, open developer console, navigate to “File | New | Lightning Application”. It will prompt for “Name” and “Description”, provide proper information.
This post is written in order of “execution flow” as depicted in above image. However, to save code in your Salesforce instance, you need to create it in opposite direction. So, basically you need to start with step 5.
In above lightning application, I have used Bootstrap to style my application, saved in static resource by name “bootstrap”. This application has only one Lightning component named “AllContactsComp”.
Lightning Component
Lightning components can be created by navigating to “File | New | Lightning Component” in developer console. It can contain “HTML + Aura components” supported by Salesforce.
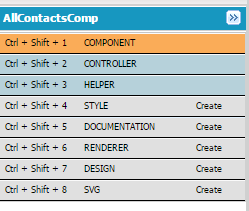
Lightning Components – Image 2
As shown in above image, Lightning component consists of Controller ( JS ), Helper ( JS ), Style ( CSS ), Documentation, Rerenderer, design and SVG. We will be using only Controller and Helper in this post.
Above component is using Apex class “ContactAura”, which I will explain in later part of this post.
Attribute of type Object[] defined as name “contactRows”.
Its calling method doinit() in handler file. “c” stands for “Controller” and “v” stands for “View” in Aura syntax.
Later part of code is iterating over variable “contactRows” and displaying ID and name.
JavaScript Controller
We can click on “Controller” link available on right of component (image 2). It will create new file by name “[component]Controller.js” , in this case file “AllContactsCompController.js” will be created.
AllContactsCompController.js
1
({
2
doInit : function(component, event, helper){
3
helper.getAllContacts(component);
4
}
5
})
this method “doInit()” is called by Component. This method is calling method in helper file.
JavaScript Helper
click on “Helper” link available on right of component (image 2). It will also create new JavaScript file which will be used by Component. This file mostly interacts with Apex method defined in @AuraEnabled static public method.
This helper file is calling method “get10Contacts” defined in Apex controller. After successful callback, it is setting variable “contactRows” defined in “View” of component. It is very important to enqueueAction so that it can be processed.
Apex Controller
ContactAura
1
public class ContactAura {
2
@AuraEnabled
3
public static List<Contact> get10COntacts()
4
{
5
return[SELECT Id, NAME FROM Contact Limit 10] ;
6
}
7
}
This apex controller is just querying 10 contacts to show on component.
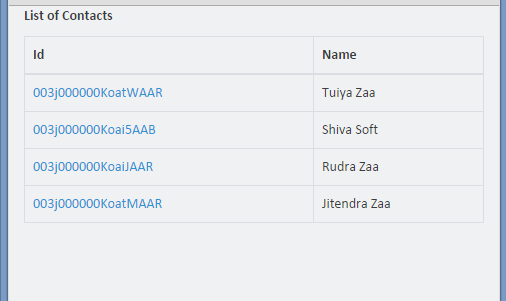
Output
You can check final output by clicking on “Preview” on right of Lightning App file explained in step 1 of image.
No comments:
Post a Comment