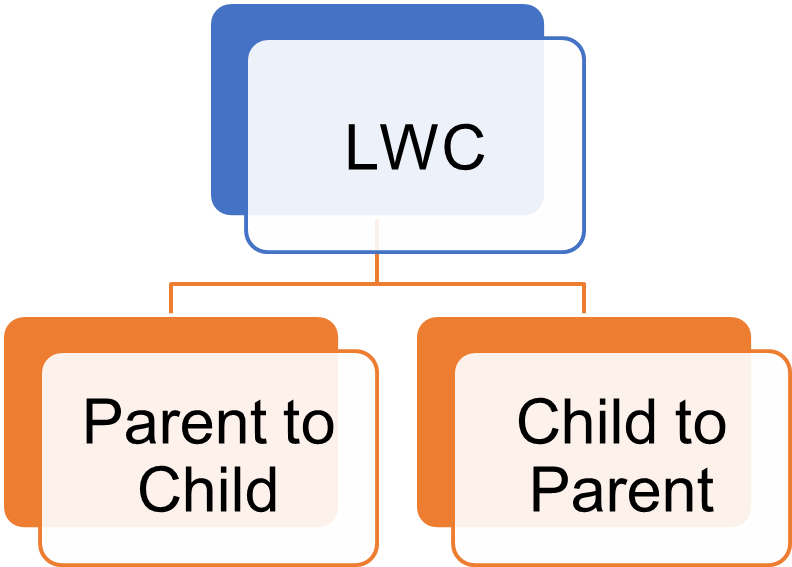
What Is Events In Lightning Web Components?
Events are used in LWC for components communication. There are typically 3 approaches for communication between the components using events.
- Parent to Child Event communication in Lightning web component
- Custom Event Communication in Lightning Web Component (Child to Parent )
- Publish Subscriber model in Lightning Web Component or LMS (Two components which doesn’t have a direct relation )
NOTE:- If you want to communicate the Lightning web component with Visualforce page then we can use LMS.
1) Parent To Child Event Communication In LWC
In Aura framework, we can call the method of Child Component from the Parent Component with the help of <aura:method>. In LWC Aura Methods Become JavaScript Methods.
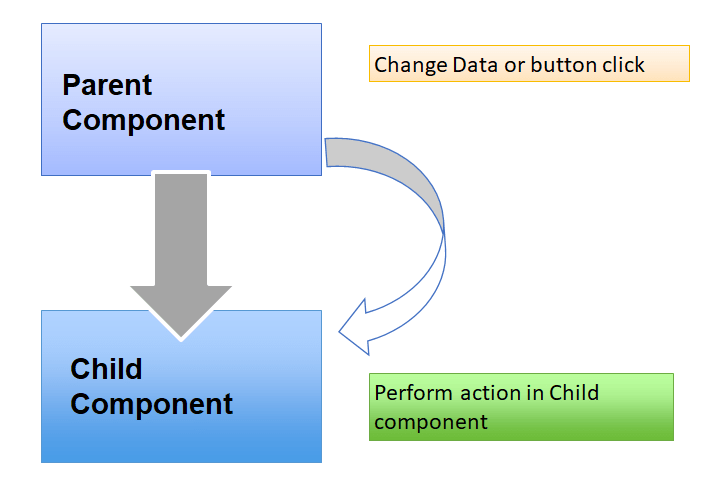
Lightning web component we can pass the details from parent to child using below two way
- Public Method
- Public properties.
We have use the @api decorator to make the children properties / method public available so parent.
Public Method
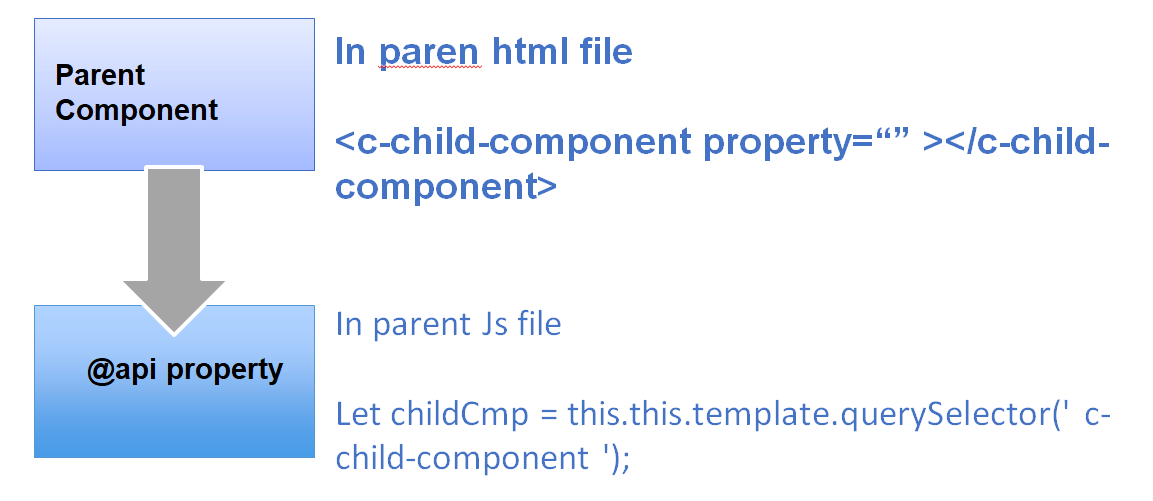
We can use the @api decorator to make the method public available so parent can be able to call it directly using JavaScript API. For example create one public method (which we need to access in parent component) in ChildComponent with @api decorator like below
ChildComponent
@api
changeMessage(strString) {
     this.Message = strString.toUpperCase();
}
To access the above child method in parent component we can do like that.
ParentComponent
this.template.querySelector('c-child-component').changeMessage(event.target.value);The querySelector() method is a standard DOM API that returns the first element that matches the selector
Lets take one example to pass value from parent component to child component.
Step 1) Create one child Component to show message from parent component
childComp.html
<template>
    Message Will Come here from Parent Component :- {Message}
</template>
Step 2) Create javaScript method in child component to assign value on child attribute
childComp.js
import { LightningElement, track, api } from 'lwc';
export default class ChildComponent extends LightningElement {
    @track Message;
    @api
    changeMessage(strString) {
         this.Message = strString.toUpperCase();
    }
}
Step 3) Create one Parent Component to call child component
ParentComponent.html
<template>
    <lightning-card title="Parent to Child Demo">
        <lightning-layout>

            <lightning-layout-item flexibility="auto" padding="around-small"  >
                <lightning-input label="Enter the Message" onchange={handleChangeEvent}></lightning-input>
            </lightning-layout-item>

            <lightning-layout-item flexibility="auto" padding="around-small">
                <c-child-Comp></c-child-Comp>
            </lightning-layout-item>

        </lightning-layout>
    </lightning-card>
</template>
Step 4) Now Create JavsScript method in Parent component to call child method with “this.template.querySelector”.
ParentComponent.js
import { LightningElement } from 'lwc';

export default class ParentComponent extends LightningElement {
    handleChangeEvent(event){
        this.template.querySelector('c-child-Comp').changeMessage(event.target.value);
    }
}
Step 5) Update your meta.js file to make this component available for App, home page.
<?xml version="1.0" encoding="UTF-8"?>
<LightningComponentBundle xmlns="http://soap.sforce.com/2006/04/metadata" fqn="parentComponent">
    <apiVersion>45.0</apiVersion>
    <isExposed>true</isExposed>
    <targets>
        <target>lightning__AppPage</target>
        <target>lightning__RecordPage</target>
        <target>lightning__HomePage</target>
    </targets>
</LightningComponentBundle>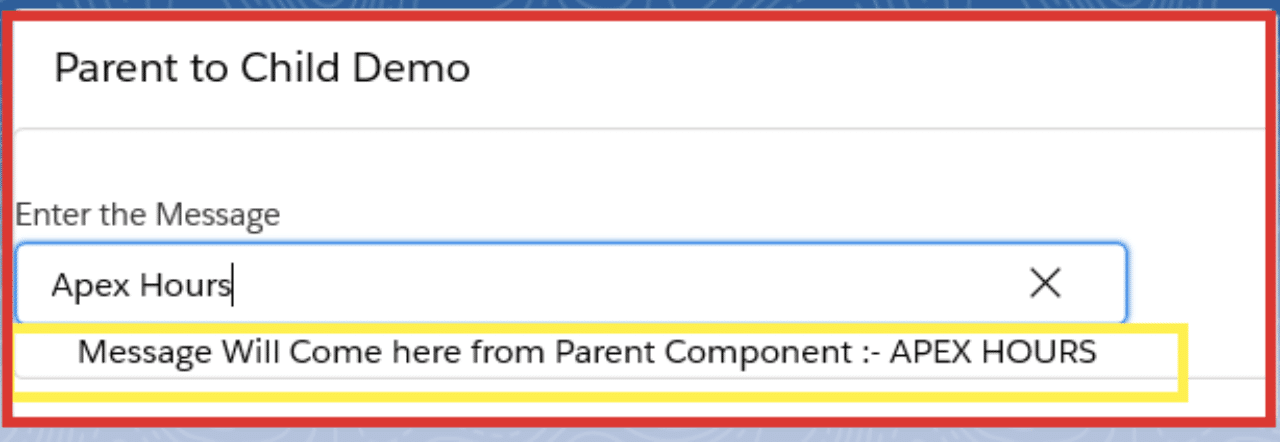
Public properties
You can make a component property public by prefacing it with the @api decorator. Then, set the public property by an external component
For example, if the c-todo-item child component has the following:
import { LightningElement, api } from 'lwc';
export default class TodoItem extends LightningElement {
   @api itemName;
}
Set the value from the parent with the following:
<template>
    <c-todo-item item-name="Milk"></c-todo-item>
</template>
Public properties are great solutions for passing down primitive values, simple objects, and arrays.
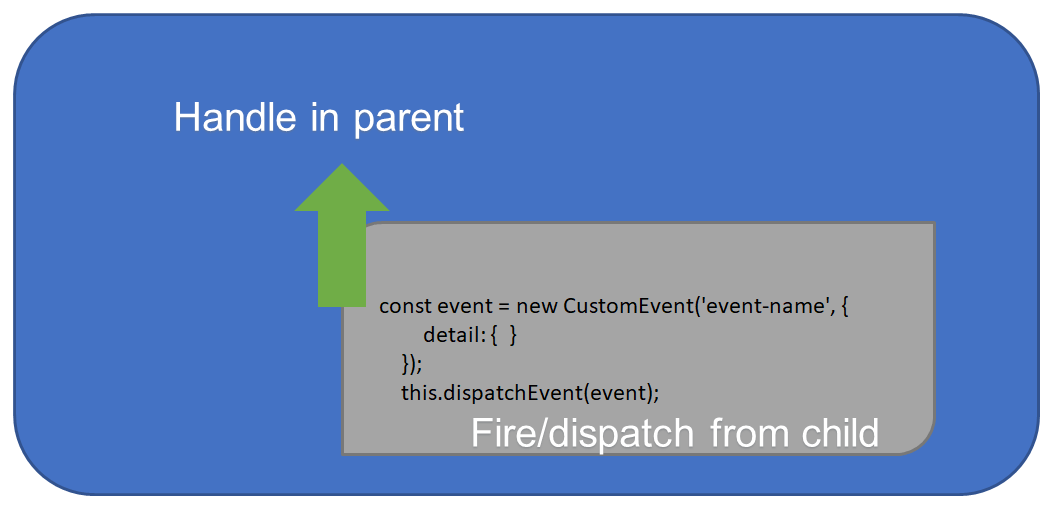
2) Custom Event Communication In Lightning Web Component (Child To Parent)
Custom Event is used to make the communication from Child Component to Parent Component. With LWC we can create and dispatch the custom event.
- Create and Dispatch an Event
- Create Event : We can use the customEvent() constructor to create an event. In constructor we need to pass custom event name and detail of the event.
new customEvent(eventName, props); - Dispatch Event : We have to dispatch an event at with EventTarget.dispatchEvent() method.
this.dispatchEvent(new customEvent(eventName, props);
- Create Event : We can use the customEvent() constructor to create an event. In constructor we need to pass custom event name and detail of the event.
- Handle an Event : There are two ways to listen to an event
- Declarative via html markup : We need to add “on” prefix in the event name in Parent Component during calling of Child Component for Declaratively event listener. ParentComponent
<template>
          <c-child-component oneventName={listenerHandler}></c-child-component >
</template> - JavaScript using addEventListener method : We can explicitly attach a listener by using the addEventListner method in the parent component like below : ChildComponent
this.template.addEventListener('eventName', this.handleNotification.bind(this));
- Declarative via html markup : We need to add “on” prefix in the event name in Parent Component during calling of Child Component for Declaratively event listener. ParentComponent
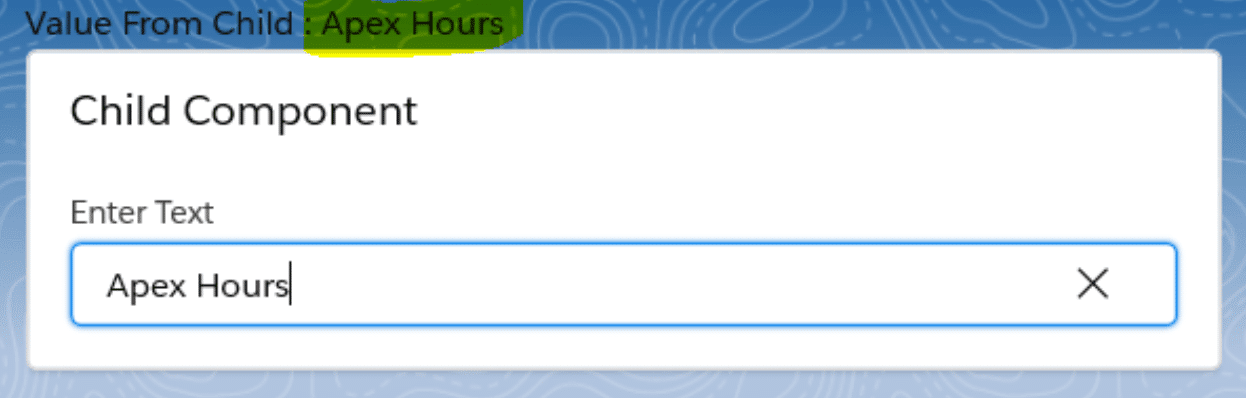
Lets take one example for “Declarative via html markup“
Step 1) Create one child component component from where we will raise a event
Create child html file to get value from user
childComp.html
<template>
    <lightning-card title="Child Component">
        <div class="slds-m-around_medium">
            <lightning-input name="textVal" label="Enter Text" onchange={handleChange}></lightning-input>
        </div>
    </lightning-card>
</template>
Step 2) Now update Child Comp javaScript file to raise a CustomEvent with text value
childComp.js
import { LightningElement } from 'lwc';

export default class ChildComp extends LightningElement {

   handleChange(event) {
        event.preventDefault();
        const name = event.target.value;
        const selectEvent = new CustomEvent('mycustomevent', {
            detail: name
        });
       this.dispatchEvent(selectEvent);
    }
}
Step 3) Create one Parent component where we will handle the event
Now create parent component. We need to add prefix as “on” before the custom event name and in parent component we need to invoke the event listener as handleCustomEvent using onmycustomevent attribute. we recommend that you conform with the DOM event standard.
- No uppercase letters
- No spaces
- Use underscores to separate words
ParentComponent.html
<template>
    <div class="slds-m-around_medium">
        Value From Child :  {msg}
        <c-child-comp onmycustomevent={handleCustomEvent}></c-child-comp>
    </div>
</template>
Now update parent component javaScript file and add handleCustomEvent method
ParentComponent.js
import { LightningElement , track } from 'lwc';

export default class ParentComponent extends LightningElement {
    @track msg;
    handleCustomEvent(event) {
        const textVal = event.detail;
        this.msg = textVal;
    }
}
Output :-
Lets see how we can use “JavaScript using addEventListener method | Attaching event Listener Programmatically”
Step 1) We can use the same above sample and do below change in parent component
Update parent component JavaScript like below
ParentComponent.js
import { LightningElement , track } from 'lwc';

export default class ParentComponent extends LightningElement {
    @track msg;

    constructor() {
        super();
        this.template.addEventListener('mycustomevent', this.handleCustomEvent.bind(this));
    }

    handleCustomEvent(event) {
        const textVal = event.detail;
        this.msg = textVal;
    }
}
Remove onmycustomevent attribute from child component tag. like below
ParentComponent.html
<template>
    <div class="slds-m-around_medium">
        Value From Child :  {msg}
        <c-child-comp ></c-child-comp>
    </div>
</template>
Step 3) Set the bubbles: true while raising the event like below
childComp.js
import { LightningElement } from 'lwc';
export default class ChildComp extends LightningElement {
handleChange(event) {
event.preventDefault();
const name = event.target.value;
const selectEvent = new CustomEvent('mycustomevent', {
detail: name ,bubbles: true
});
this.dispatchEvent(selectEvent);
}
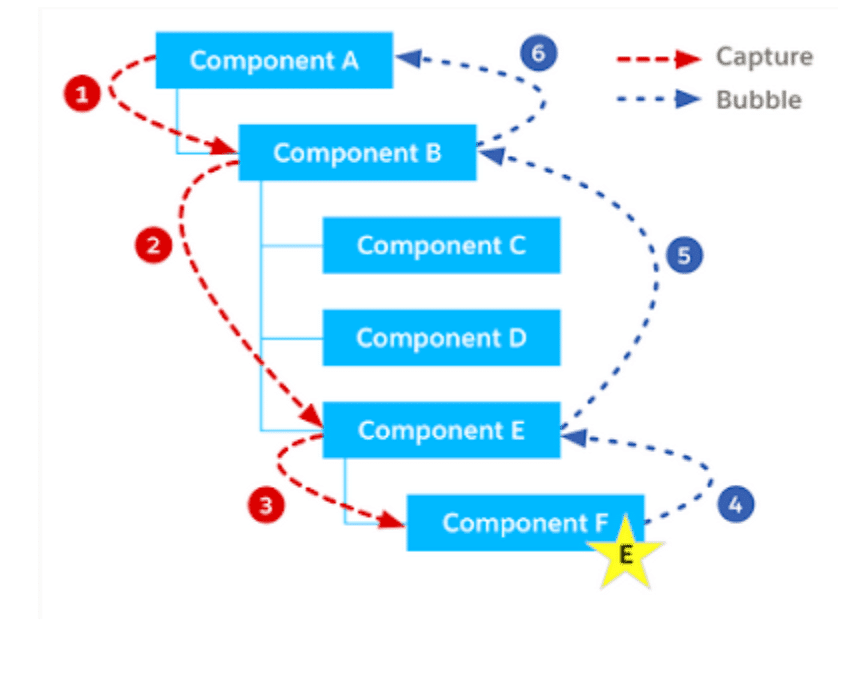
}Event Propagation: When an event is fired the event is propagated up to the DOM. Event propagation typically involves two phases event bubbling and event capturing. The most commonly used event propagation phase for handling events is event bubbling. In this case the event is triggered at the child level and propagates up to the DOM. Where as event capturing phases moves from top to bottom of the DOM. This phase is rarely used for event handling.
The below picture shows the event phases both in capture and bubbles phase. In LWC we have two flags which determines the behavior of event in event bubbling phase.
- bubbles A Boolean value indicating whether the event bubbles up through the DOM or not. Defaults to false.
- composed A Boolean value indicating whether the event can pass through the shadow boundary. Defaults to false.
3) Publish Subscriber Model In Lightning Web Component.
Application Events in aura become a Publish-Subscribe Pattern in Lightning web components. We use an library called pubsub to achieve the communication between two components which doesn’t have a direct relation to each other. This works like a typical publish subscribe model. Where an event is subscribed by a component and handled when another component which fires/publishes the event within the same scope.
Pubsub module support below three method
- Register
- UnRegister
- Fire
Follow below step for Pub Sub module
Step 1) import Pub Sub file from here.
Step 2) Register the Event
Add JavaScript Code in Component to register and unregister the event. In this JS file, invok registeredListener() and unregisterAllListeners() in the respective methods such as connectedCallback() and disconnectedCallback().
MyComponent.js
import { registerListener, unregisterAllListeners} from 'c/pubsub';
export default class MyComponent extends {

    @track Message;
    connectedCallback() {
        registerListener('messageFromSpace', this.handleMessage, this);
    }

    handleMessage(myMessage) {
        this.Message = myMessage;
        //Add your code here
    }

    disconnectCallback() {
        unregisterAllListeners(this);
    }
}
Step 3) Fire the event
Fire the event from other Component. In that js file, We need to trigger the event with name and value. Remember, we also need to send the page reference attribute as current page reference for successful communication
OtherComponent.js
import {  fireEvent } from 'c/pubsub';
import { CurrentPageReference } from 'lightning/navigation';
export default class OtherComponent extends LightningElement {
     @track myMessage;
     @wire(CurrentPageReference) pageRef;

     sendMessage() {
          fireEvent(this.pageRef, 'messageFromSpace', this.myMessage);
     }
}
No comments:
Post a Comment